FORMS XD Admin User Guide
Getting Started With the FORMS Site
Welcome Email
You will receive a welcome email when you register for a FORMS account. The email will contain a key and instructions on creating your password.
FORMS passwords require a minimum of 10 characters or more, consisting of at least one capital letter, one lower case letter, one number and one non-letter/digit character, for example, an exclamation mark. An example of a FORMS password would be Pa55w0rd!!
The FORMS Username for either the FORMS portal or the FORMS App, is the email address used to create the FORMS User Account.
When you attempt to log into FORMS, if you enter the wrong credentials 5 times, you will receive an email warning you that 5 failed login attempts have been made. You will be notified by multiples of 5 attempts, for example on 5, 10, 15 20 failed login attempts. Logging in with the correct credentials will permit access to FORMS.
However, if there have been 10 failed login attempts against the same FORMS account, from the same IP address, within five minutes, FORMS will block the FORMS user account for five minutes.
Accessing the FORMS Site
-
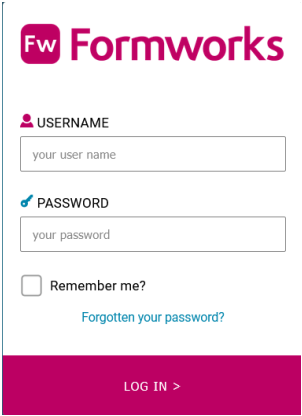
Go to www.formworks.uk.com. The FORMS Log on screen is displayed
-
Type your User name and password
-
Click LOG IN.
The FORMS log on screen
Please note, you can tick Remember Me? To save the password as a browser cookie.
How to reset your FORMS password
-
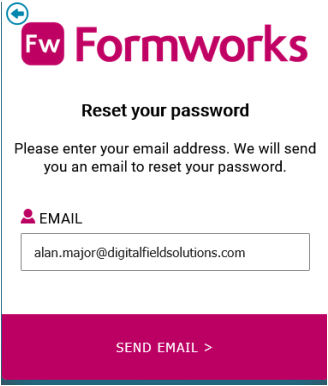
Go to www.formworks.uk.com
-
Select the “Forgotten your password?” link.
The Reset your password screen is displayed
-
Type your email address
-
Select the SEND EMAIL link. An email will be sent to your email address with further instructions to reset your password. An administrator level user can also request a password reset, from the device user’s profile record. Only the last/latest password reset link that is emailed to the user will be valid for use.
The FORMS Home Page
There are two main areas to the FORMS site, Form Templates and Admin. When you first login to FORMS, if you are a Form Author the Form Templates screen will display.
Form Templates Tab

Admin Tab
The Admin Tab provides options to Manage Users & Roles, Manage User Groups, Manage Devices, Manage Exports, allocate exports to templates (Template Exports), Export History, Licence information and Sync Management.

Install tab
Clients using Enterprise versions of FORMS can access the Install tab from their iPad to download the latest version of the FORMS Application.
Docs
Selecting this tab opens the folder containing the current user guides and other useful support type documents.
Support tab
The Support tab takes you to the Digital Field Solutions Ltd support centre. You would use this option to create a new support ticket, should you experience problems with the FORMS application or associated software. You could also check the status of an existing support ticket. Alternatively, you can email support@digitalfieldsolutions.com with any support related queries you might have.
Log Off
The Log Off tab logs you out of the system and returns you to the log on screen.
Form Templates
Form State and the Lifecycle of a form
Templates can be in one of two states, Designing and Published. Using the Search field, Folders options and filters at the top of the screen, you can select your templates.
Folders
Creating Folders
Folders provide an easy means to group and select your templates.
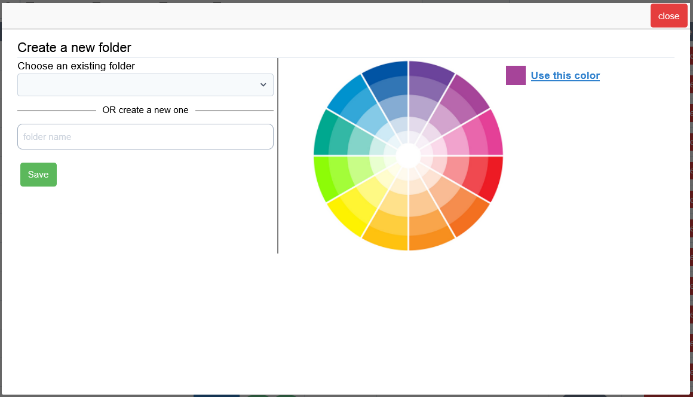
Click the horizontal black line, to the left of the template that you wish to place in your folder. Select the “Choose an existing folder” field to select an existing folder, or enter a new folder name in the “OR create a new one” field.
Select a colour to easily identify the folder on
the Form Templates screen. The colour will show on the use button next to the colour wheel. You can select the use button to save the selected colour, then try other colours for comparison. If you decide you preferred your original colour selection, just click on the reset button to revert to your original use colour.
Select the Save button to create your folder.
Adding Templates to a Folder
As above, click the horizontal black line next to the Template. Select the folder you wish to add the template to, or create a new one, in the example, Demo Folder. Select a colour to represent the folder, then select the Save button.
Deleting a Folder
Either select the Folder icon against a template in the Folder you wish to delete, in which case the Folder screen will be populated with the correct folder, or select any Folder icon, then select the folder to be deleted from the list box. Then click the delete (trash can) icon.
ID
This is a unique number automatically allocated to your template. When you require support, this piece of information is extremely useful as a method of identifying to the support desk, the exact template you are referring to.
Title
This is the name that you have given your template. Clicking anywhere in the column header, will sort the list of templates into alphabetical order, first ascending, then descending. When naming templates, you should always include a version identifier, for example My Template v1. Increment the version part for each new iteration of the template. At the end of the title line, it will indicate if the template is to be used on the iOS platform, as a web-form, or both (default).
Selecting the Title link loads the Template Designer screen
Duplicate
When you need to create a form based on a previous form example, use the Duplicate option. This will create an exact replica of another form. It is good management practice to use a different name for each form, for example Job Sheet v1, Job Sheet v2 etc.
iPad / Web
This column indicates if the template can be used as either an iPad or Web input form, or both.
Created / Updated
These two columns indicate the date the template was created, and when it was updated last or published. The Updated column also indicates who last amended the template.
Template Designer User Name
The name of the user who last updated the template.
State
Templates can be in one of two states, either Designing or Published. Forms start their life in Design State. This stage is where you design and pilot test your forms. You can issue Design State forms to users to test your form design and export methods, but you must publish templates before you use them to capture live data.
Designing
Templates in Design state can be edited and re-saved. They can be seen on the iPad by any Form Authors, or if the template has been allocated to a user’s group. Whilst you can make some changes without the underlying database being effected, any changes made to a design state template that involve any change to the collection of fields, will cause all previously entered forms to be deleted.
This is one of the reasons that forms in design state should never be used to capture live data. Forms used to capture live, valuable data should always be published before use.
WARNING: DO NOT USE TEMPLATES THAT ARE NOT PUBLISHED FOR LIVE DATA AS DATA LOSS CAN OCCUR WHILE A TEMPLATE IS IN DESIGNING MODE AND BEING TESTED.
Published
When you have thoroughly tested and piloted your form design and are ready to capture live data, you should first Publish the form. Published forms are locked by the Template Designer in order to prevent data loss due to unexpected form changes that may affect the underlying database structure of the template.
Some amendments to published forms are permitted, including:
-
Reference text changes
-
Label text
-
Scripting changes
-
Metadata
-
Some element properties (e.g. visibility, enabled, amend single/multi select options)
-
Add/update local databases
-
Enable audio
-
Amend prefill options
Scripting changes made after a template has been published, affect both In Progress and Submitted forms. However this depends on whether the submitted form is of a template type that permits edits to submitted forms. Changes to the Reference Text of forms only takes effect after forms have been saved again, or submitted.Only Published forms can be exported to the Cloud Hub.
Retire or Delete
Select this option to retire or delete the template. The Retire Template dialogue box will display.
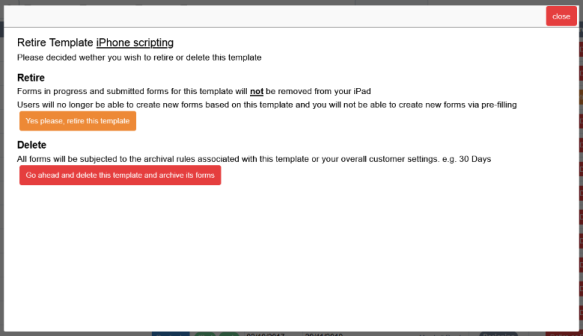
Yes please, retire this template
Select this option to remove the template from the device user’s iPads, but retain any work in progress / saved forms. This option will remove the template from the FORMS portal and device user’s iPads, preventing any new forms from being created, but it will permit device users to submit and resubmit forms they have already started or submitted. You have the option of un-retiring templates.
Go ahead and delete this template and archive its forms
This option will remove the form template from device user’s iPads and delete any forms that they have started and saved and any un-started prefilled forms.
Un-retiring & Undeleting templates
You can un-retire and undelete templates, which will reinstate the template, any forms in progress that are present on the server and any un-started new prefill forms.
Note: Undeleting a template will restore any forms on the FORMS portal that have not been permanently removed by the normal archiving process. The template would be restored to the iPad, and any forms returned to their correct folders, In Progress and Recently Submitted for example.
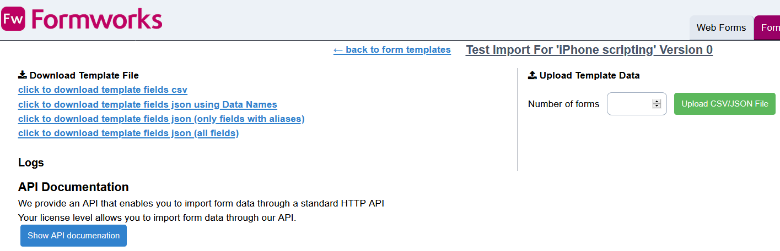
Data Import
Select “Import” (or “Test Import” for in design forms) to produce either a csv or json file that includes all the fields in the FORMS template. The file can be used to prefill and distribute forms based on the FORMS template. For full details of prefilling, see the chapter Prefilling /Pre-populating Form Data
The PDF column of the Templates screen relates 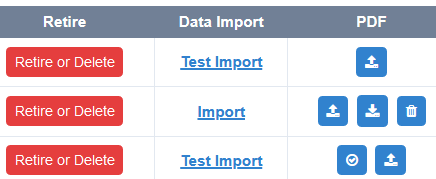
to templates that use bespoke headers and footers instead of the FORMS default footers.
The circular, tick icon is used to check whether a bespoke PDF is present. This default setting can be seen against the third entry in the table.
If no PDF is present, the single upload icon is displayed, as per row 1, and can be used to upload a PDF containing your required footer.
If a bespoke PDF is already linked to the template, three option buttons display, as per row 2. You can use these buttons to upload a new PDF, download the existing PDF, or delete the currently applied PDF.
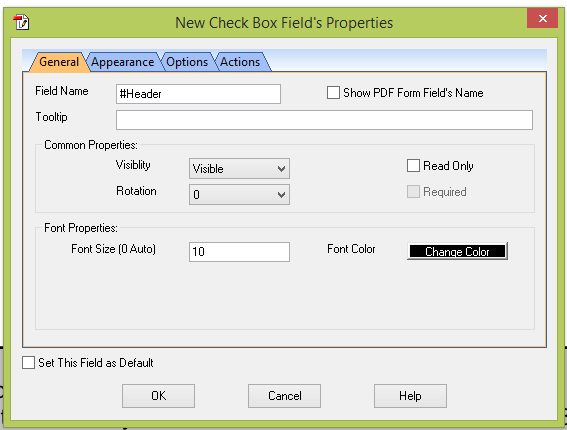
For bespoke PDF’s the area occupied by either the header or footer must be defined by a digital ‘field’ which can be accomplished using either Adobe Professional or a similar application, such as PDFill PDF Editor. The height of the field determines the depth of the header or footer. The other dimensions of the field are irrelevant. These fields must be named #Header and #Footer respectively.
In the below example the #Header is at the top of the PDF and extends to just below the dark grey line. The #TemplateName and #PageTitle fields are within the height of the #Header field.

Common Header / Footer Options
Set elements to Hidden in PDFill that contain these instructions, if their values change per page, for example, page number or page title, and set to visible if values are the same across all pages, for example, template name and formid. Other properties can be set such as the font, text colour and font size.
-
#Header (set Visibility property to hidden),
-
#Footer (set Visibility property to hidden)
-
#Page (set Visibility property to hidden)
-
#PageOf (will show Page # of #) (hidden)
-
#formID (visible)
-
#TemplateName (visible)
-
#PageTitle (hidden)
Admin
The Admin tab provides options to manage users and user groups, devices, exporting data, the export history and licence, Sync Management, Databases and Token Management information.
There are ten potential tabs to administer your FORMS account.
-
The Manage Users & Roles tab displays details of all of your user accounts for FORMS.
You can create new users and edit existing user accounts. -
The Manage User Groups tab allows you to group users together and assign form templates to groups.
-
The Manage Devices tab displays details of each device that has the FORMS application.
-
The Manage Exports tab allows you to set up export types for the forms.
-
The Templates Exports tab allows you to link forms to an export.
-
The Export History tab provides details of all form data exports. This includes whether the export was successful, and if an email was sent. Forms that have not been archived can be viewed here.
-
The Licence tab provides details of your licence agreement.
-
The Sync Management tab provides details of the synchronisation process to the iPad.
-
The Databases tab provides a method of uploading databases, in the form of CSV files that can be used by your templates. For example, a database could contain client contact information or product pricing data, that your templates could look up, even when offline.
-
Token Management enables web form open links to be created and managed.
-
SQL Bridge Management provides details of forms uploaded via the SQL Bridge as well as updates within the app.
Manage Users & Roles
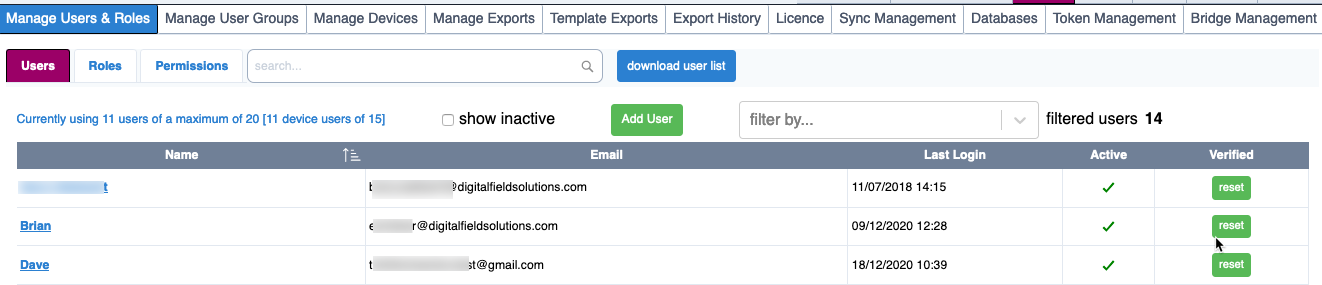
The Manage Users & Roles tab is used to create and edit User Accounts and Roles for your company. Users can only have access to this page if they are a Client Administrator, Client System Administrator or they have been given a bespoke Customer Role with access.
This tab is further divided into Users, Roles and Permissions. The number of available device and web user licences and how many are in use, will display at the top left of screen, in this instance, 11 of a total of 20 available web and device user licences. The user count outside the brackets are for web and device, while the user count within the square brackets are for device users only (in this case 11 out of 15 are being used. If Web Forms are not present then both totals will display for device users only.
The Download User List button will download a csv file of all Users created, active and inactive. The file contains information such as when the User was created, updated and what roles they have permission to.
Users
A User is someone who has system roles, and includes:
-
Client System Administrator
-
Client Administrator
-
Client Task Manager
-
Device Users
-
Form Author
-
Hub Admin
-
Hub User
-
Web Forms
-
Custom Roles (roles which can be defined by an administrator)
A list of your User accounts is displayed in the table. These can be filtered, using the search
option at the top left side of the screen. To include inactive user accounts, select the Show inactive checkbox at the top of the screen. You can Add a User by selecting the green Add User button, and filter by User Roles, for example, Device User, by selecting a Role from the list box to the right of the Add User button. A User count of all visible Users will show next to the filter list box.
Use the Verified column to generate a new password change request email. The coloured reset button in the Verified column indicates the Verified status of the user, in relationship to the email link that was sent to them, requesting that they changed their password:
-
Green: The user has received the email, and set their password. Or a password request has been sent to the user, and they have not responded, however the link on the password request is still active and can be used.
-
Amber: A password request has been sent, and the link has expired. A new password request will need to be generated.
By default, only User Accounts with the Is Active option ticked are included in the table listing. Tick, “show inactive” to include disabled accounts.
-
Click on any heading in the table to sort the results into ascending or descending order. An icon will appear to the right of the column, indicating the column the display is currently sorted by.
-
Type in the search field to filter the results.
There are two functions that can be performed in the Manage Users & Roles tab.
-
Click Add User to create a new user account.
-
Select the user name to edit the user record. Please note, you cannot edit your own account unless you are a Client or System Administrator.
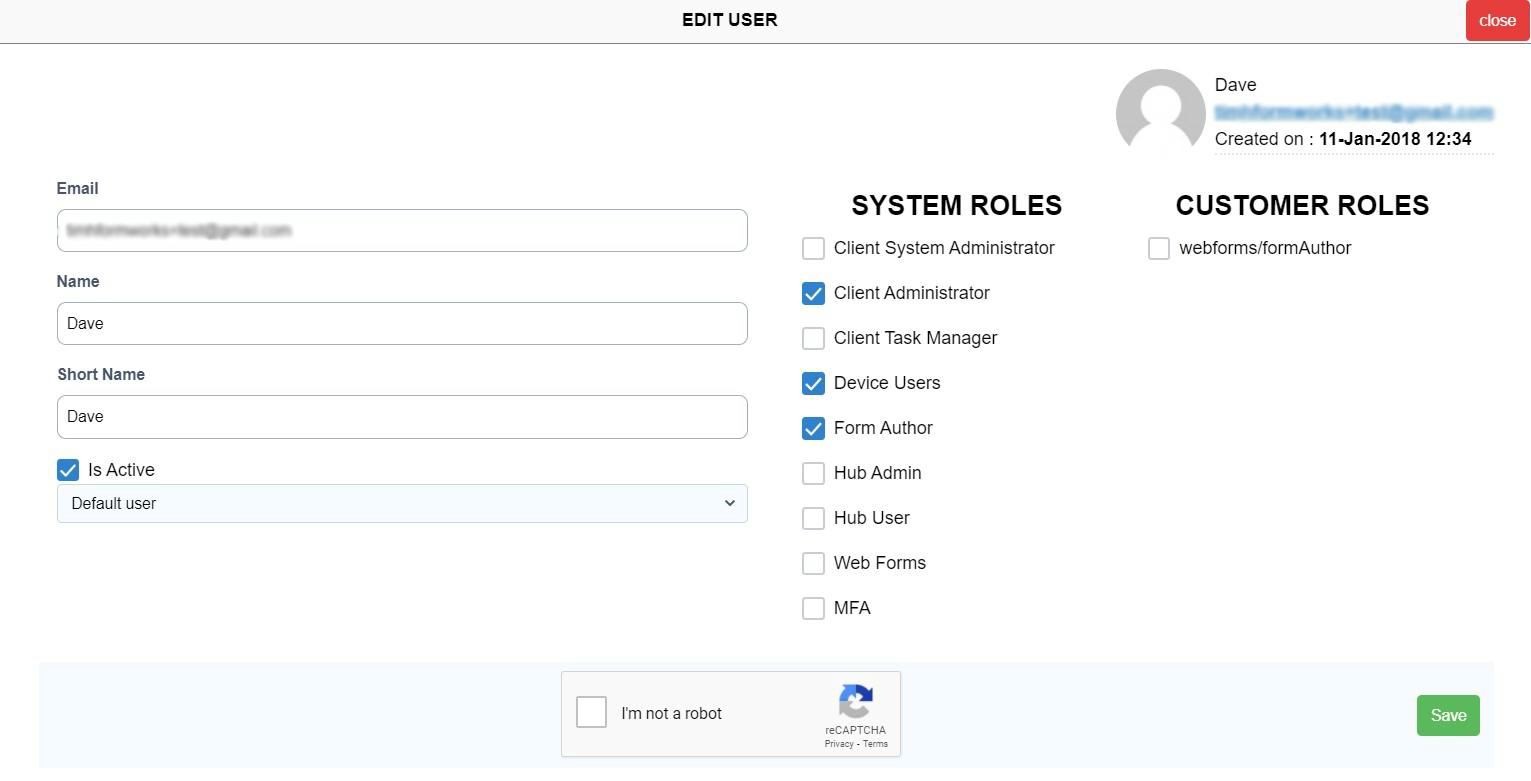
Add New User
New User Accounts can be created from the Manage Users & Roles tab in the Admin section of the site. This screen is the same as if the User Record Edit option had been selected.
-
Click Add User to create a new user. The Create New User window is displayed.
-
Email - Enter the users email address. This will form the users Login Name on the FORMS portal and any input devices.
-
Name – Enter the user’s full name.
-
Short Name - Enter a short name for the user. This is optional.
-
Is Active – You could remove this tick if the user becomes inactive, for example, if they leave the company.
-
User Type - Select if the User is a Default User or an Open Link (Token) User. Open Link Users will only have access to Webforms
-
SYSTEM ROLES – These are the FORMS systems default roles. Select the SYSTEM ROLES that apply to the user.
Client System Administrator – This role can add and update user accounts and have access to the Licence page.
Client Administrator – This System Role provides access to everything except Web Forms, Form Templates and Designer, the Cloud Hub and Device access. Please see the Client Administrator section below.
Client Task Manager- This role provides access to the Template Designer and prefill import screen. Form Templates and Designer, User Groups, (but not the Users screen), Manage Devices, Manage Exports, Template Exports, Export History, Licence, Sync Management, Databases and if licenced, Token Management.
Device Users – This setting allows users to input data on the FORMS application.
Form Author – This setting allows the user to create and edit form templates.
Hub Admin – This setting indicates a Reporting Hub Administrator.
Hub User – This setting indicates a standard Reporting Hub user.
Web Forms – This setting permits the user to complete FORMS Web Forms.
-
CUSTOMER ROLES – These are roles created and maintained by the customer. Allocate the user to these as required.
-
I’m not a robot - To save your changes, first place a tick in this box.
-
Save. The account is created and an email is sent to the user with their log on details. If save is successful a message will appear in green to confirm.
Roles
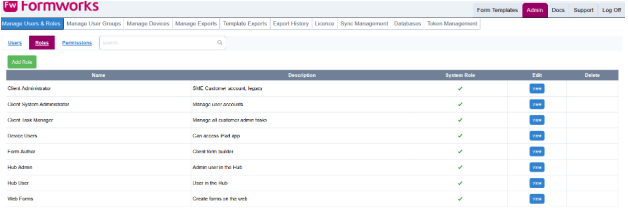
The system has default roles; Client Administrator, Client System Administrator, Client Task Manager, Device Users, Form Author, Hub Admin, Hub User and Web Forms. You can also create your own client specific roles, combining whatever FORMS portal functionality you require.
Client Administrator
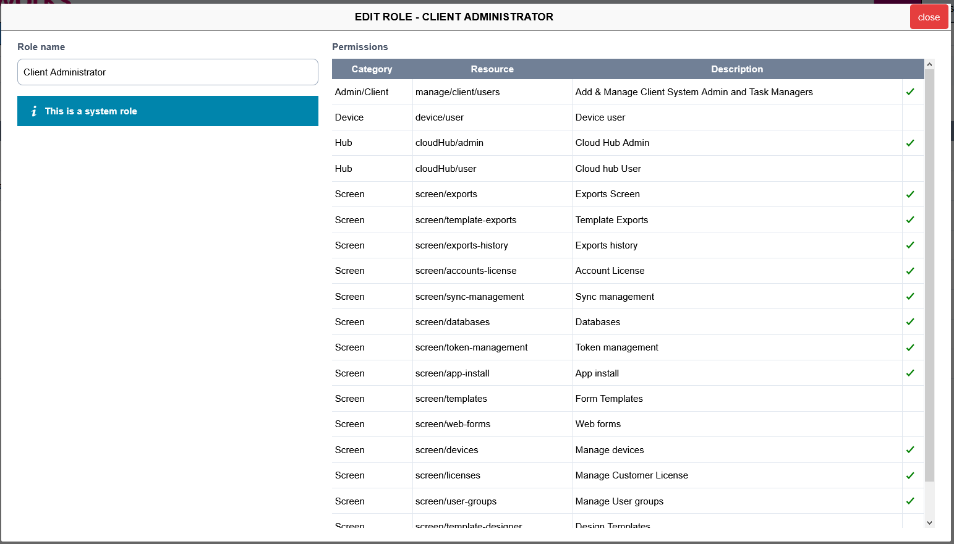
The Client Administrator role is available for SME Clients only so may not be available. The Client Administrator account provides access to all client functions, other than template design, importing of prefill forms and access to the Reporting Hub and Web Forms. However, you can add a user defined role to a Client Administrator that could include any additional required functionality. This is a System Role and therefore its functionality cannot be amended. This is the option that smaller companies would use to manage the FORMS portal. Password requirements are: Must be 10 characters and the password cannot be repeated within the last 8 password change requests. You can view what functions a Client Administrator can perform, by selecting the View option at the right of the role name.
Client System Administrator
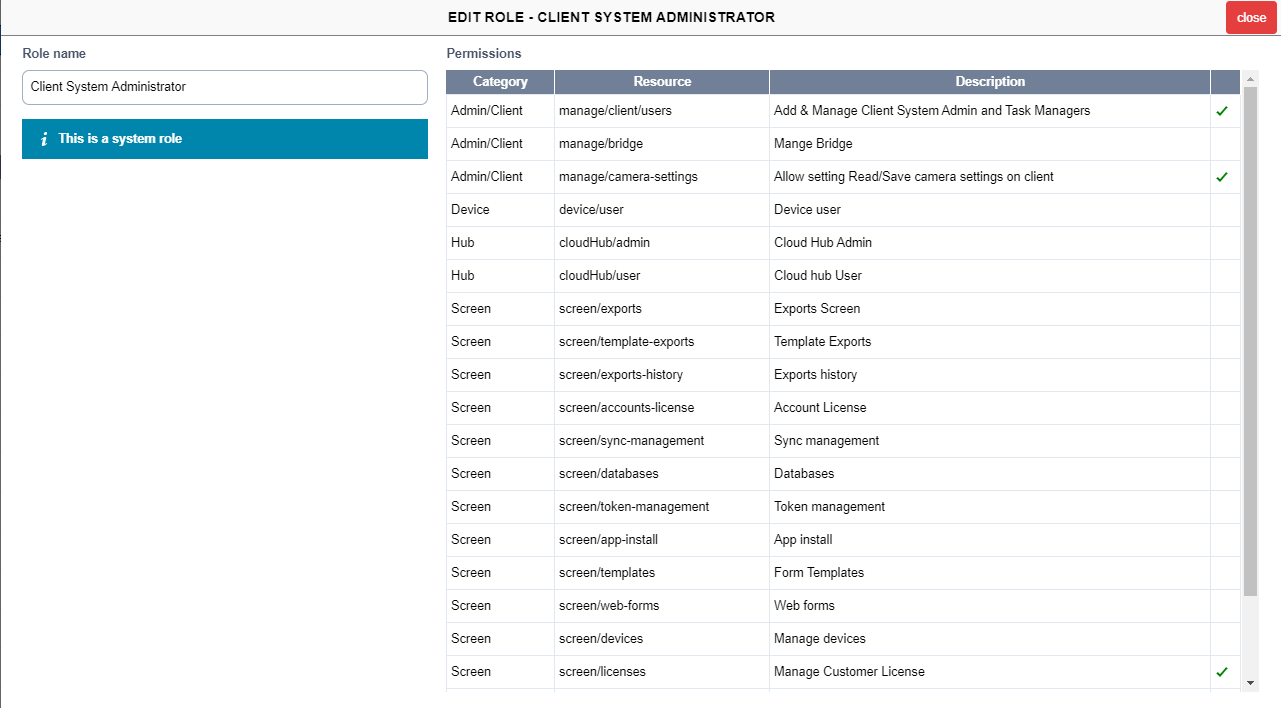
This System Role only provides access to add users of all types, manage device licences and view and edit Client Licence controls such as save photos to camera roll. This is a standalone role and cannot be paired with other roles. As it is a System Role, it cannot be amended. As with other roles, you can select the View option, to see what functions the role user can perform. These are indicated by a green tick at the far left of the available functions.
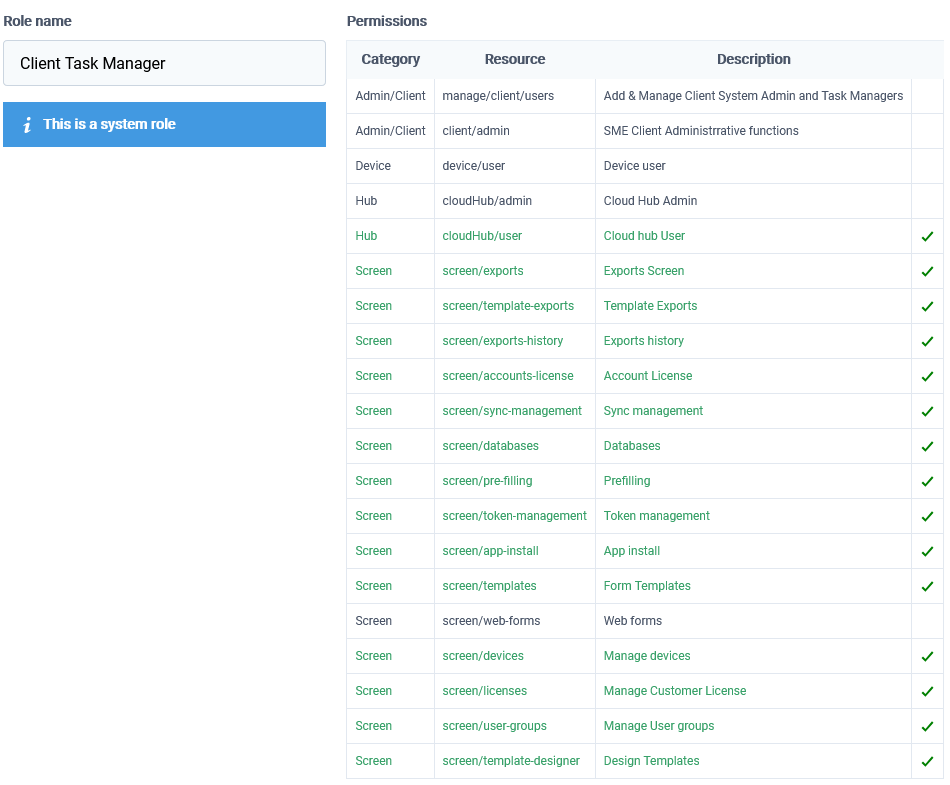
Client Task Manager
A Client Task Manager can perform most functions, other than creating and amending User Accounts. As it is a system role, it cannot be amended. But you can add other roles to a user appointed as a Client Task Manager.
Creating Your Own Roles
From the main Admin tab, select Manager Users & Roles. Then select Roles, then the green Add Role button.
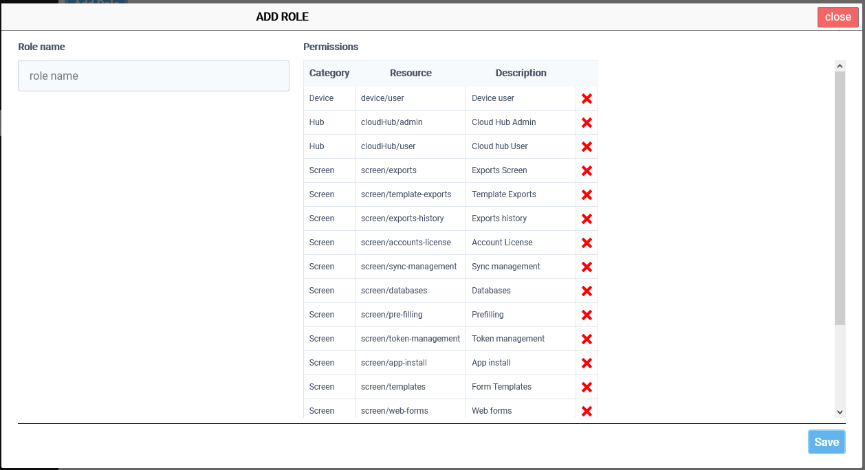
-
Enter a name for the new role.
-
Select the permissions to include in the role, from the available permissions.
-
Save the role.
-
It will now appear with the other Customer Roles, for example on the User Account screens, and can be allocated to users.
Editing / Deleting Roles
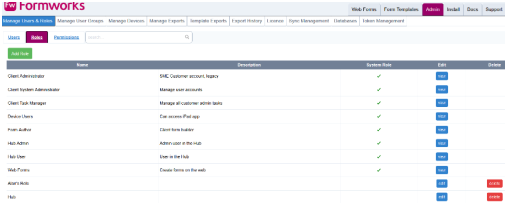
Once you have created a role, you can edit it using the Edit icon at the right of the Roles table. As you can see, System Roles are View only. You can only edit and delete roles that users have created.
Permissions
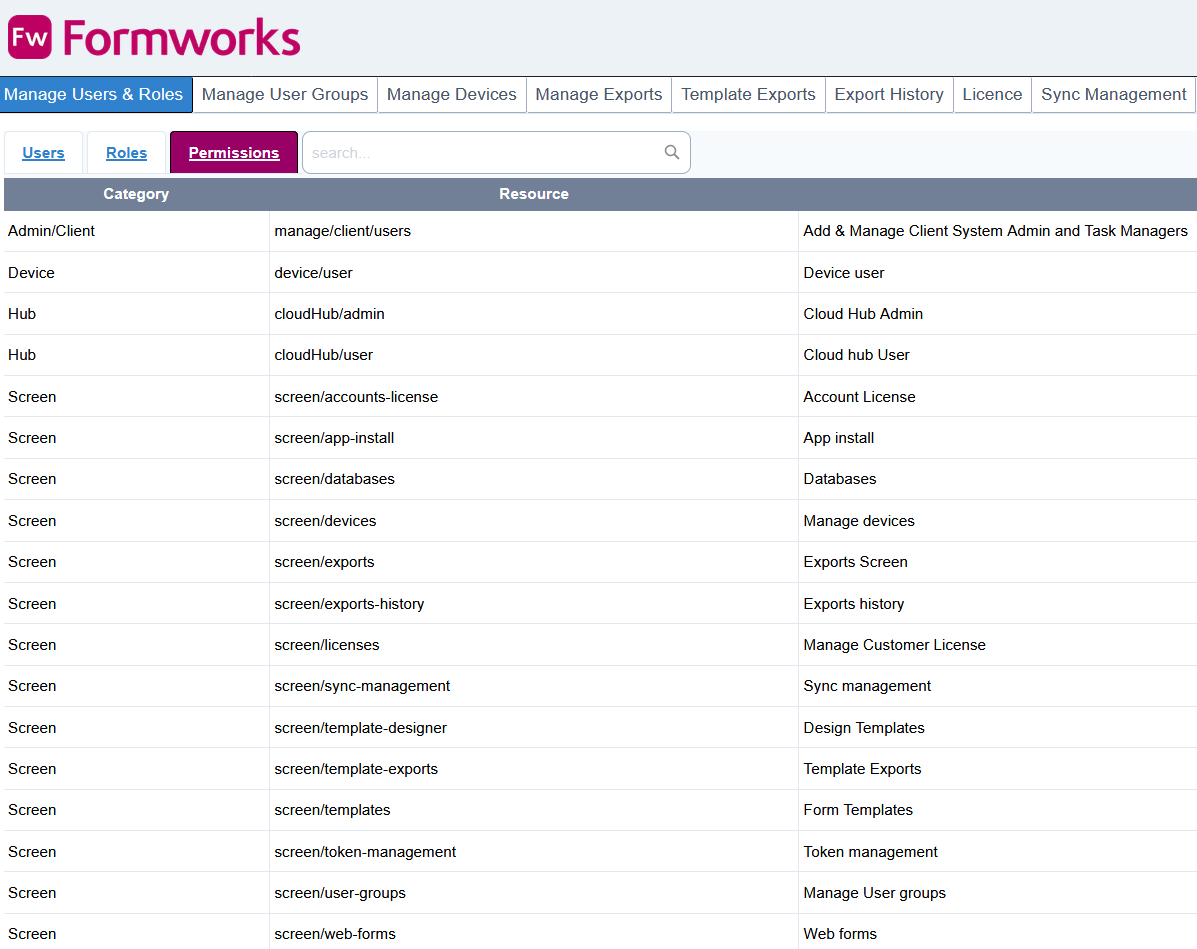
You can view the list of possible permissions, from the Admin tab, then Manage Users & Roles, then select Permissions. Permissions are fixed and cannot be created at client level, but you can view the permissions available to incorporate within your roles.
Manage User Groups
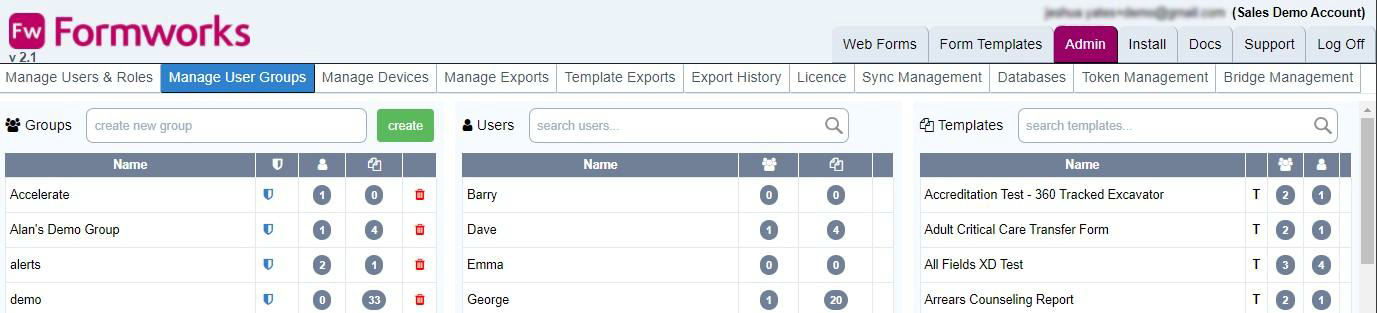
The Manage User Groups tab allows you to create user groups to manage user access to your FORMS form templates. Users and templates can be assigned to multiple user groups. User groups make it easy to develop templates, allocating them only to developers and testers, within a Test Group environment, then rolling the templates out to a small number of users in say a Demo Group, then finally publishing the templates and deploying them to the field force, a few users at a time, in a controlled roll-out strategy.
Lists of User Groups, Users and Templates are displayed in the three tables.
-
The tables are sorted alphabetically by their content. But, making selections places related and relevant list items in alphabetical order, and highlighted, at the top of the tables. For example, selecting any entry in one of the three tables, will place group ‘linked’ items in the other two tables at the top of their respective tables. The selected item remains in its current position within its own table. In the capture, selecting Alan Test Group has placed one user within that group at the top of the Users table, in alphabetical order and one template at the top of the Templates table.
-
You can search on either User or Template by typing in the search fields. This is a convenient method of discovering all the groups and templates that a user has access to, or all the groups that a template has been allocated to. Once the table list has been reduced by the name you have typed, select the name from the table:
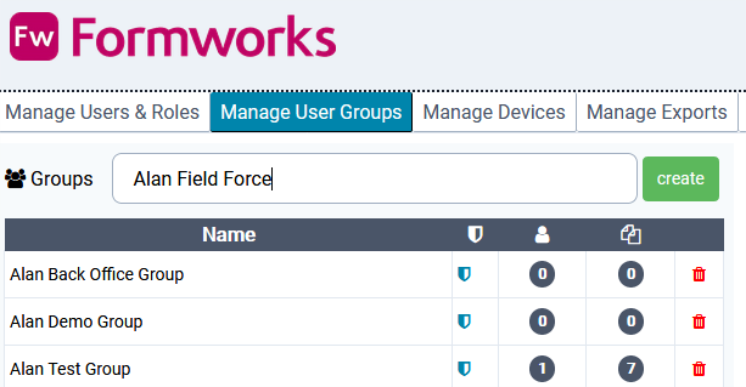
Create New Group
To create a new user group, enter the new group name in the “create new group” field above the Groups table. Once you have entered the group name, select the green create button. The new group will appear, highlighted, in alphabetical order, in the Groups table.
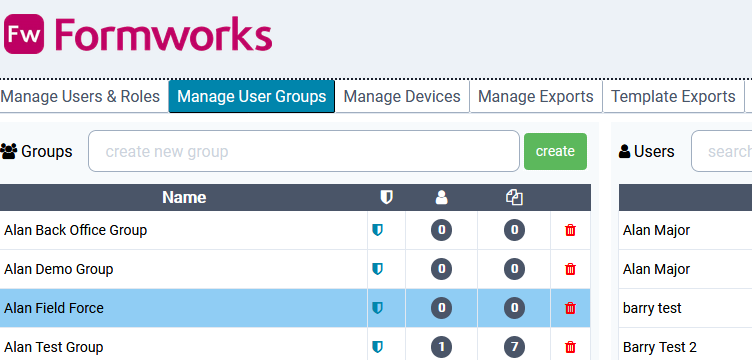
Assigning Users and Templates to a User Group

To assign Users and Templates to a user group:
-
Select the User Group from the Groups table.
-
Add users to the group by clicking the plus icon at the end of the user record.
-
Add templates to the group by clicking the plus icon at the end of the Templates record
-
Select the green save icon at the top, left side of the screen. Note, this icon will become visible as soon as you select users/templates to add to your group. To undo your selections, click the amber Undo button next to the green save icon.
Manage Devices
The manage devices tab allows you to view a list of your devices that have the FORMS application installed and have logged into the FORMS portal.
A list of your devices is displayed in the table. You can click on the table headings to sort the contents

Type in the search field at the top left of the screen, to find any records that match the search criteria. The search will happen automatically as you type characters.
Device records can be filtered by the last time and date that they were logged into FORMS, by a number of date restricting options.
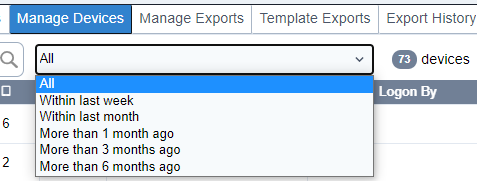
The delete button deletes the device record from the FORMS portal.
Manage Exports
The manage exports tab allows you to create and edit export options for your form data. From the main tabs at the top of the screen, select Admin, then Manage Exports.
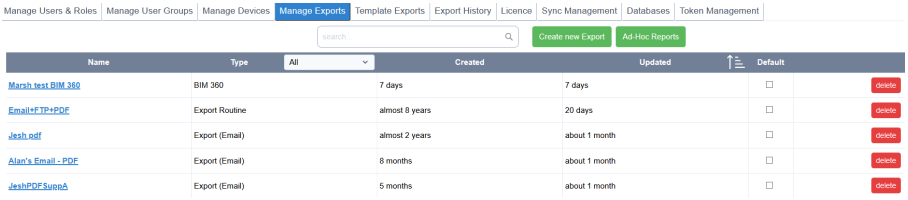
Exports Table
Existing exports are displayed in the table. Selecting any of the column headings will sort the table, first into ascending, then descending order. An arrow appears to the right of the column heading, indicating the current sort order for the table. You can also filter the exports by type, i.e., All, Routine, Email, Notification etc., using the dropdown list box next to the Type column heading.
| Name | Selecting the export name lets you edit the selected export’s options. |
| Type | There are eight different export types available. These are detailed below. |
| Created | This column indicates when the export was created. |
| Updated | This column indicates when the export was last updated. |
| Default | This column indicates which, (if any), export is the default. Defaulting an export option makes it easier to select from the Template Exports screen. |
| Delete | Selecting the delete button, deletes the export. You will be required to confirm this action. |
Searching
Type all or part of the export Name in the search area to filter out any exports whose names do not match the search criteria.
Ad-Hoc Reports
Select the green, Ad-Hoc Reports button to generate On-the-fly reports against published templates. You can also view log details of previously generated reports here.

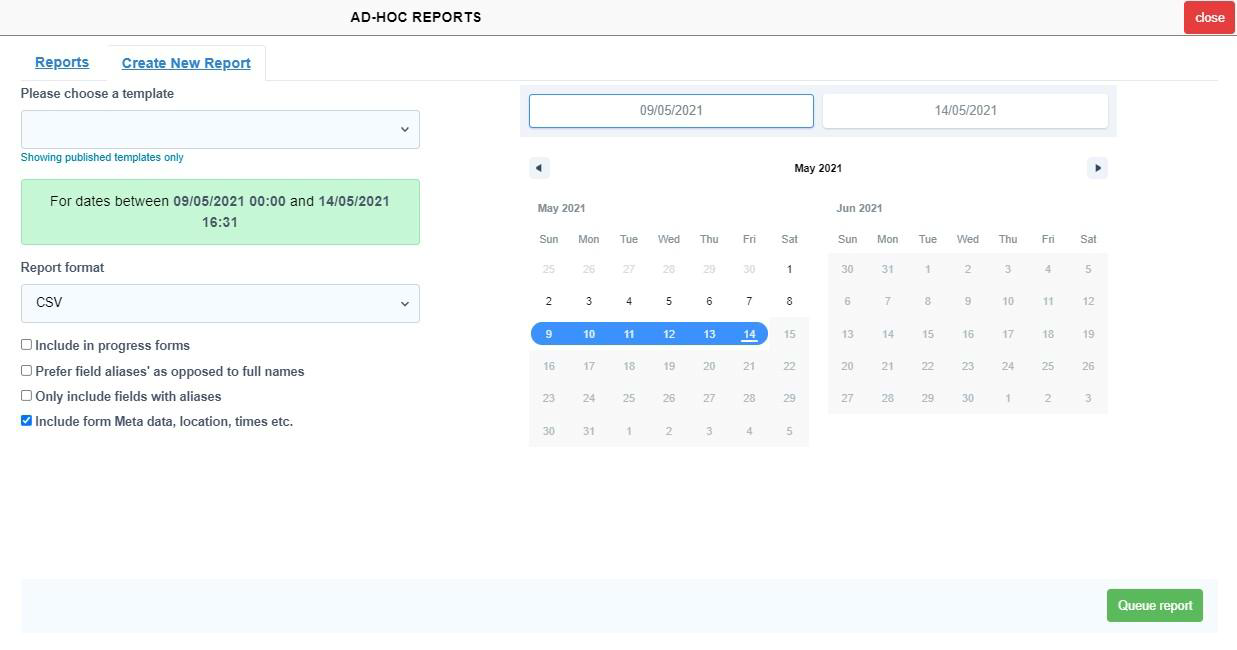
To create a new Ad-Hoc report, select the blue Create New Report link at the top of the page. The Create New Report screen will display.
Please choose a template – Select a template to run your Ad-Hoc Report against. Only published templates are available in the list.
Report format – CSV is the only option currently available to use for Ad-Hoc Reports.
Include in progress forms – You have the option of including both submitted (by default) and in progress forms.
Prefer field aliases’ as opposed to full names – Select this option to display alias names as opposed to the fully qualified field name, as column headings on the CSV output file.
Only include fields with aliases – Selecting this option will filter out of your report, any fields that do not have an alias name. It will still show the fully qualified fields names for these fields on your report, unless you also select the, “Prefer field aliases’ as opposed to full names” option.
Include form Meta data, location, times etc. – This option includes the geolocation and date/ time that the form was started and the date and time it was submitted.
Date range – Reports are able to be run for the last 30 days only.
When you have specified your report parameters, select the green, Queue report button at the bottom, right of the screen.
Export Types
There are eight export types. To see them displayed, select the green, Create new Export button:
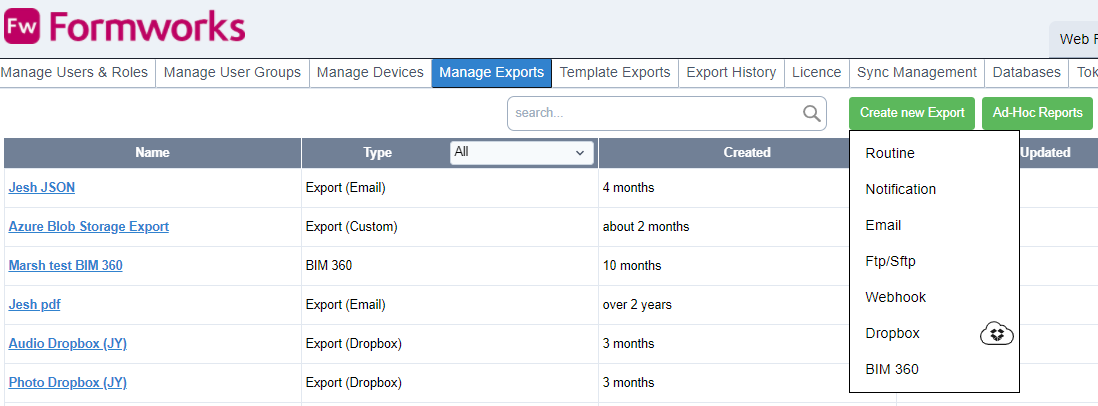
-
Routine to create a new export Routine that groups multiple export options together.
-
Notification to create a new email notification option. This sends an email without attachments.
-
Email to create a new email export option that contains one or more attachments.
-
FTP/SFTP to create a new File Transfer Protocol (FTP) or Secure File Transfer Protocol (SFTP) export option. For time sensitive exports, this is a better option than an Email export.
-
WebHook to export to a Web service. This is an additional service and not a standard export.
-
Dropbox to export to a Dropbox location. To enable this export please contact support.
-
BIM360 to export to Autodesk BIM360. This is an additional service and not a standard export.
-
Custom exports are those created by DFSL to provide bespoke export functionality (view only).
Note:
If FORMS is unable to export data, for example due to a web service or FTP site being unavailable, or an email address not existing, the system will retry five times before giving up. The time period between each retry is two minutes, multiplied by the number of failed attempts. For example, if the first attempt fails, it will wait two minutes before retrying. If this attempt fails, it will wait another four minutes before retrying, then another six minutes, etc. After this period, you will need to manually re-export the form data. From the Export History tab of the Admin page, filter by Export Status to ‘Failed’ and then Re-Export Data against the specific form data submission.
If a form was submitted prior to an export being allocated against the template, you cannot then allocate an export, and use the re-export option. The export will run however, if the form is resubmitted on the device or via webform.
Export Routines
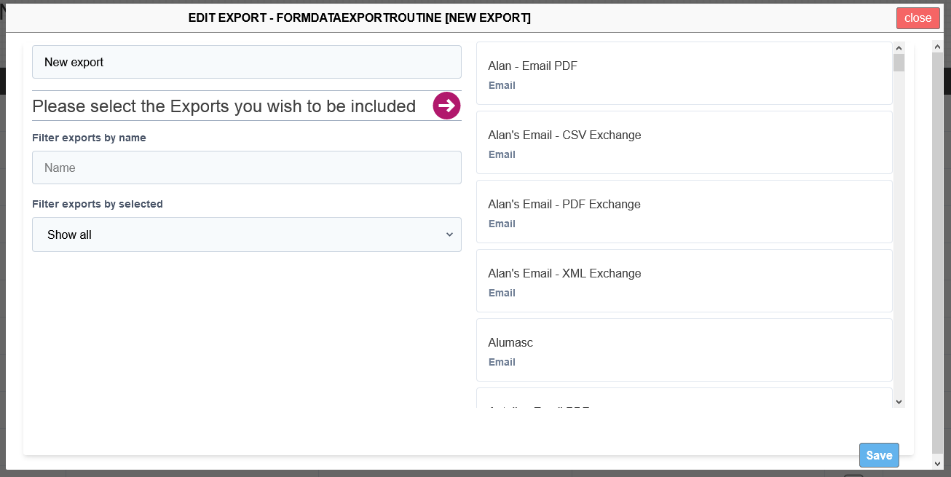
Each export can only accommodate oneexport type, i.e., Form layout PDF, CSV, XML etc. You use Export Routines to group exports together in a routine. This means you can export multiple documents, to multiple locations, per template, when a form is submitted.
To create a new Export Routine, select Admin, from the main menu tabs. Then select Create new Export, then Routine. The exports available to incorporate into your routine are displayed on the right.
-
Enter a name for your export.
-
You can filter the listed exports by entering text in the “Filter exports by name” field.
-
You can also filter exports using the Filter export by selected. There are three options:
-
Show all - Lists all available exports. Incorporates filter.
-
Show only selected - Lists only exports included in the routine.
-
Show only non-selected - Lists exports not in the routine. Incorporates filter.
-
Notification
An option to notify users by email, that a new form has been submitted can becreated in the Manage Exports tab. This option only generates a notification, and does not include any attachments.
You can include data from fields on your forms, within the Subject line and body of the email. For example, a company reference number and client name entered on a form can become part of the subject line of the email, to assist in filing and sorting emails.
Use the [form.SubmittedBy] instruction to export to the device user’s email address.
-
From the main Admin tab, select Manage Exports
-
Select the green Create new Export button.
-
Select Notification. The Notification (Email) window is displayed.
-
Enter the export name and email address(s). You can enter multiple email addresses if you separate them with the comma (,) character.
-
Select the green Save button. The Notification export option is created.
An option to export form data via an email can be created in the Manage Exports tab. The data can be exported as JSON, CSV, XML, various PDF layouts and either a Word (now deprecated) or Excel template.
You can include data from fields on your forms, within the Subject line and body of the email. For example, a company reference number entered on a form can become
part of the subject line of the email.
You can also take the value of an element on your form as the email address. You include form element data by enclosing the fully qualified element name in square braces, for example [Page1.Section1.EmailAddress]. You cannot use element Alias names.
Use the [form.SubmittedBy] instruction to export to the device user’s email address.
-
From the main menu, select the Admin tab, then Manage Exports
-
Select the Create new Export option.
-
Select the Email option from the list of export types.
-
Export name - Enter a descriptive name for the export.
-
Enter the email address of the recipient. You can either type in a literal email address, or take the value from a field within the form, or the device user’s email address. If you wish to export PDFs to more than one email address, separate them with either the comma (,) or the semicolon characters (;).
-
Subject and Body values. Both the email Subject area, and the email body, can contain both literal values and the values from fields within the submitted form, by enclosing the fully qualified field name, within square brackets. You can combine free format text with element values, so the instruction: Client: [Page1.Section1.Client] would be acceptable. You cannot use element Alias names for this. You should try to keep your Subject values a reasonable length, as long Subject field values can cause problems with some email systems.
-
Export Type – Select the file export type, by default this is set to PDF (Form Layout). Please note you cannot include multiple export format options, within a single export. Use an export routine, to export different export formats simultaneously. For example, both PDF and CSV files. You can specify the name format of output files, based on fields contained within your forms. Please refer to the section Formatting PDF output file names for details.
-
Only include Datanames - this option only applies to the JSON export type, where the file will only contain fields that contain a Dataname.
-
Use field alias names as headers – this option only applies to CSV files, and where available, alias names will be used instead of fully qualified field names.
-
PDF Suppression is linked to the Template Designer window. Against every element you will have the option of selecting three levels of PDF suppression. For example, to suppress the PDF output of elements for this particular export, you could place a tick in the “A” box against the element, in the Template Designer, then place a tick against the “A” box in the export.
-
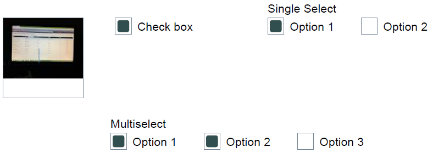
Print Photo Time and Checkbox Style - These options affect the appearance of checkboxes and photos on PDF output. The standard output is for photos not to be date/time stamped and for a selected checkbox to display a solid square. But you can also indicate a selected checkbox with a cross or a tick, as shown here:

-
Export as a zip instead of individual files – will combine the output files as a single zip file.
-
Include label text with all form data – this option only affects CSV and XML output – and is not available with PDF outputs. With CSV output, it places label text into a third line on the CSV file. With XML, it causes the ‘friendly’ names of fields to be included with the attributes for each field. Labels will ALWAYS be included in the PDF output.
-
Include embedded images with all form data – select to include template embedded images with exported form data. Only available with XML with linked media option.
-
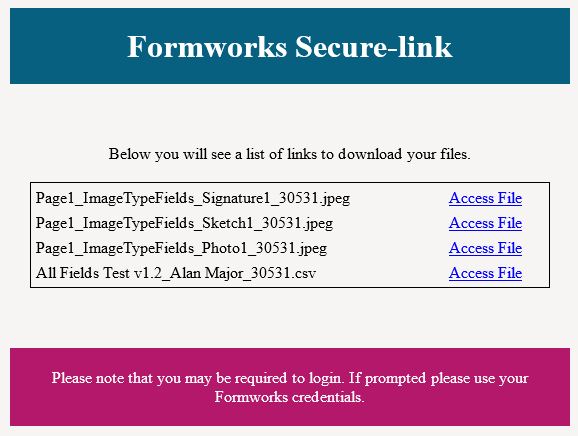
Add attachments as secure links - generates an email containing secure links to individual output files. See the details below on this option and Secure Links. 16. Save button – Select to create the export.
Secure Links
This option is only available with Email exports. An emailed link is used to gain access to output files.

Export Formats
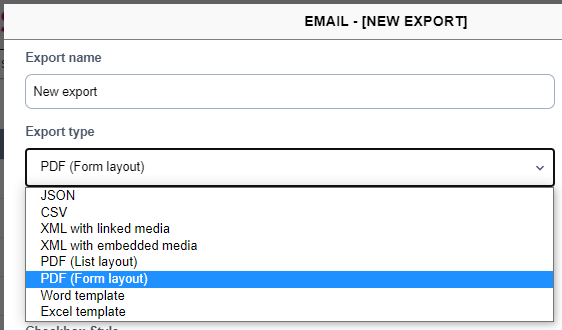
A number of different export types are available. The CSV and XML options are self-explanatory, however, it is worth noting that if you prefill forms, the first, unique column in the prefill upload, ‘Your Reference’, appears on both CSV and XML output files as the ‘Reference’ column, and the form reference text, as it would appear on the Export History and FORMS applications menus, is included in the CSV output’s ‘Description’ column.
Selecting CSV, XML and JSON will change the appearance of the export screen. For example, you will not have the option of suppressing elements unless you select PDF output, and you will not have the option of using Alias names as column headers unless you select CSV output.
JSON
Select this option to produce a text output file, formatted as JSON. An Only Include Datanames option is available, which will only include fields within a template that have been given Datanames in the file.
PDF (List layout)
This option produces a simple columnar listing, with the field name displayed on the left, and the value for the field on the right. Paragraph fields display slightly differently. Because paragraph fields normally contain more text, the name of the field displays on one line, and the content starts directly beneath, spanning the entire width of the page. This reporting format option does not support Tables elements. These require the Form layout option.
PDF (Form layout)
The PDF (Form layout) option produces a PDF document that looks the same as the form appears on the FORMS Template Designer and the iPad.
You can display photos, enlarged at the end of the PDF output, by including a text box named, PDF_Show_Images on the FORMS template. This element could be set to hidden for appearance.
You can suppress the additional meta-data table that is produced at the end of the PDF report, by including a text box with its name property set to PDF_No_Metadata. The title is irrelevant, but the name must be an exact match. Again, this text box element could be set to hidden. The Form layout option is required to view Table elements on your PDF output.
You can control the formatting of dates on the output PDF by placing a text box on the template with its Title property set to __DateFormat. You then place a line similar to the following in the template’s OnStart event, where DateFormat is the text box’s Alias: DateFormat.value = "dd/MM/yyyy";
Word template (this option is no longer available)
This option tells the export routine that you intend to allocate a previously uploaded Word template. You select the exact Word template in the Template Exports tab. The FORMS v2 Word Template Designer guide provides details on how to create a Word template using our Word Add-In application.
Excel template
Use this option to indicate that you intend to allocate a previously uploaded Excel template in the Template Exports tab. You cannot actually select the Excel template at this point, just indicate that you intend to use one. Note: The Excel template export feature is an additional, licensable option, not included within the standard FORMS system licence. Full details of this feature are included later in the guide.
FTP / SFTP
An option to export form data to an FTP host can be created in the Manage Exports tab. The data can be exported using the same formats as the Email export option. These are detailed in the Export Formats chapter.
-
From the main Admin menu, select Manage Exports, then Create new Export, then select the Ftp/sftp option.
-
Type the export details. Please note that Export name, FTP host, Username and Password are mandatory fields.
-
Select the Export type. See the Export Formats chapter for more information on options.
-
Export media files will be selected by default and can be used to export audio or
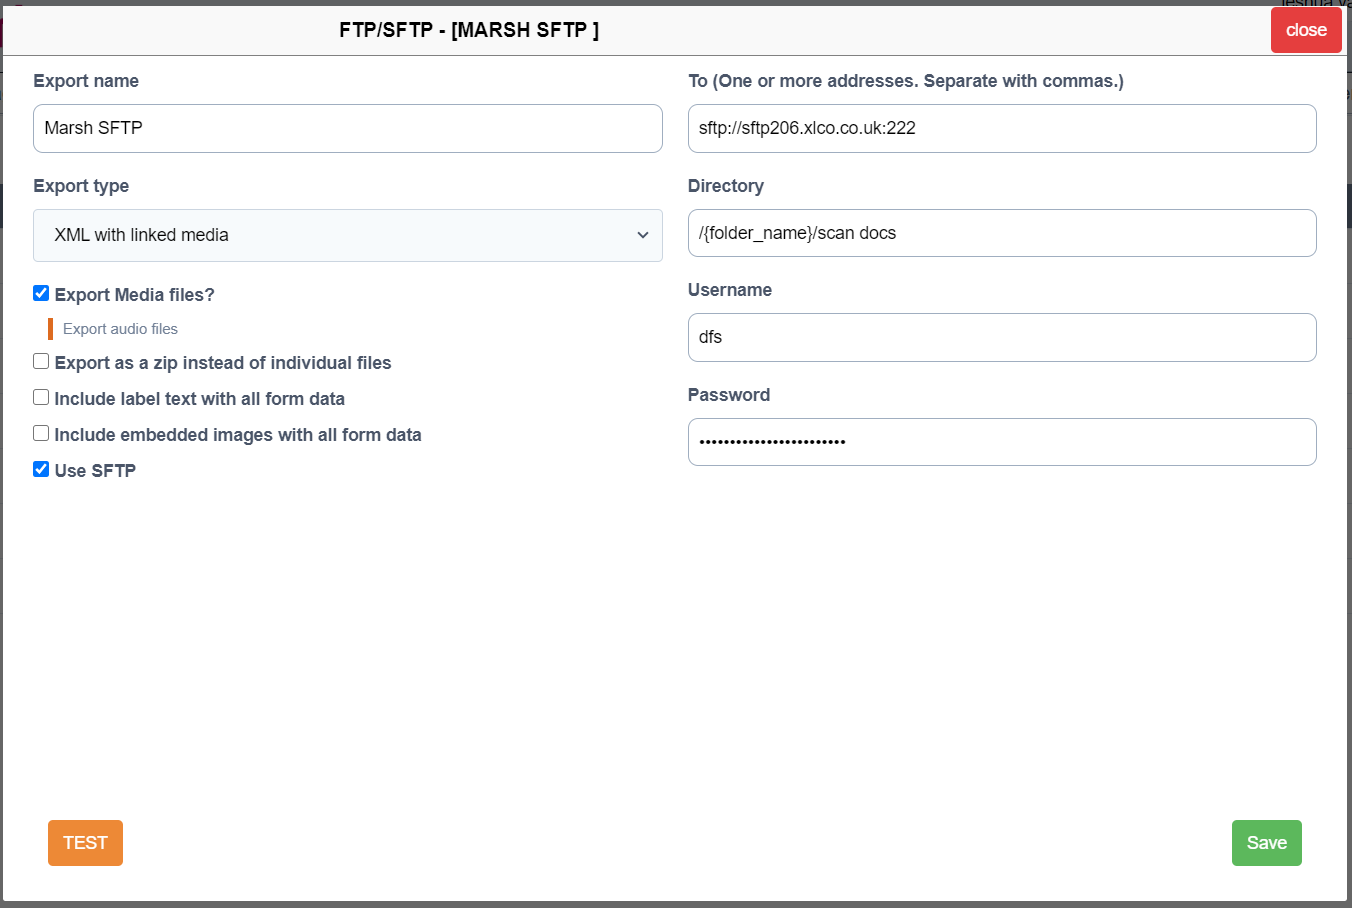
photo files if present. -
To export as a zip file, place a tick in the, “Export as a zip instead of individual files” check box.
-
The “Include label text with all form data” option only affects the output of CSV and XML files.
-
To include images that were embedded in your forms, with the exported data, place a tick in the “Include embedded images with a form data.”
-
To use the Secure File Transfer Protocol, place a tick in the “Use SFTP” box
-
Select the Save button.
-
The amber TEST button can be used to test the export functions correctly. It does this by creating a text file called formworks.txt and sending it to the FTP location.

WEBHOOK
An option to export form data to a web service can be created in the Manage Exports tab. The data can be exported in the standard FORMS export formats.
-
From the main Admin tab, select Manage Exports, then
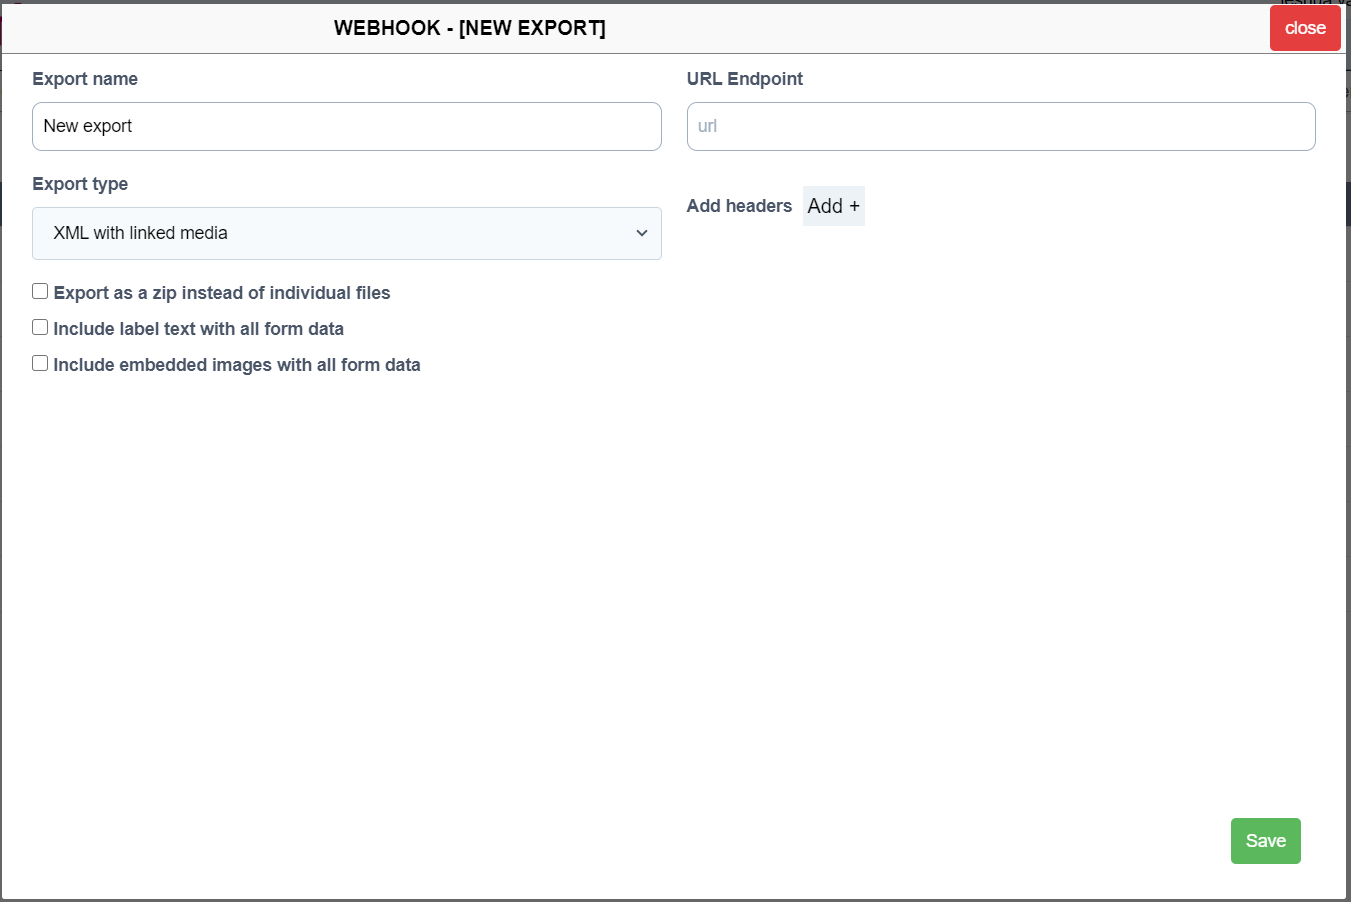
Create new Export. Then select the Webhook option. -
Enter a descriptive name for your export.
-
Enter a URL Endpoint for the web service.
-
Select an Export type. These are detailed in the chapter, Export Formats.
-
To export as a zip file, place a tick in the “Export as a zip instead of individual files” check box.
-
To include the text from labels on your forms with the exported data, place a tick in the “Include label text with all form data,” box. This will include the text from ALL labels. The
“Include label text with all form data'', option only affects the output of CSV and XML files. On CSV files, there is an additional row on the output, that includes the field Titles. On XML files, the field titles form an additional attribute for data elements. This option has no effect on PDF output, and by default, label text will always be exported.
-
The include embedded images with all form data option, only applies to the XML Export Type.
-
Select the Save button.
Note:
When the FORMS web service generates all the required files for an XML or CSV export, it sends them to the HTTP server as a multipart/form-data request.
The CSV file would contain any image file names, and subsequent HTTP content types would include, for example, signature files named the same.
So, basically, the endpoint HTTP service just needs to save all the files sent in the POST and then match the data.
Dropbox
The Dropbox export type will transfer FORMS output files directly to a Dropbox account.
-
From the main Admin tab, select the Manage Exports tab, then Create New Export. Then select the Dropbox option.
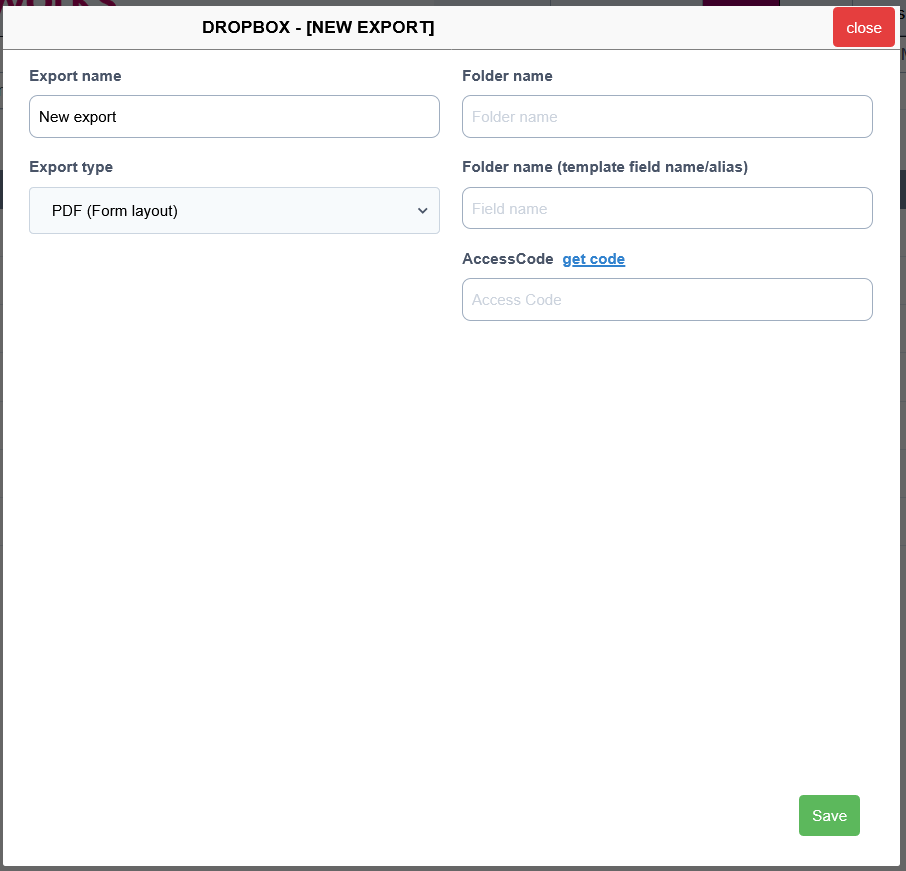
-
Export name: Enter a descriptive name for your export.
-
Export type: Select the Export type from the list. Details of export types can be found in the Export Formats chapter.
-
Folder name: Enter a Dropbox folder name. This will be a folder name, within the Dropbox directory structure, within the Apps, FORMS directory. For example Dropbox/Apps/Formworks/Timesheets. Dropbox insists on an Apps directory when you link other applications to it.
-
Folder Field Name is an alternative to the Folder name field. You can enter the fully qualified field name from a template to be used instead. This permits dynamic naming of folders.
Access Code: Select the ‘get code’ link: If you are already logged into Dropbox, the access code will automatically be inserted into this field. Otherwise you will be taken to the Dropbox login screen first.
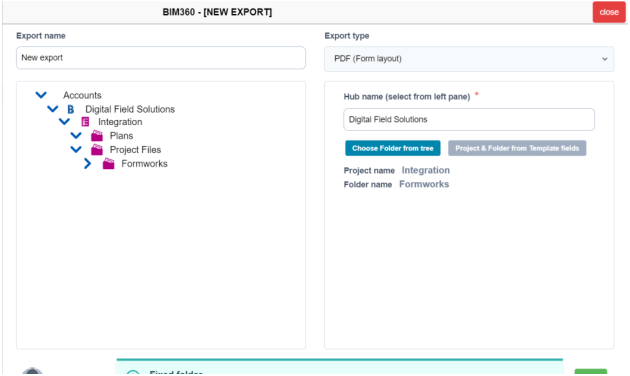
Bim360
BIM360 exports require the pre-existence of a BIM 360 account.
-
To create a BIM 360 export, from the main Admin tab, select the Manage Exports tab, then the Create new Export option, then select the Bim360 option.
-
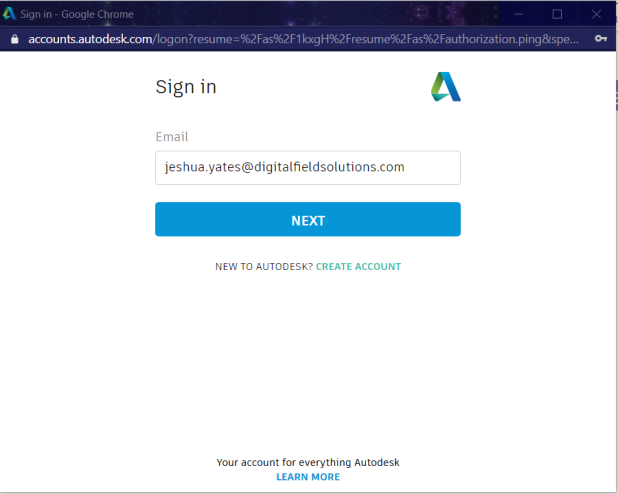
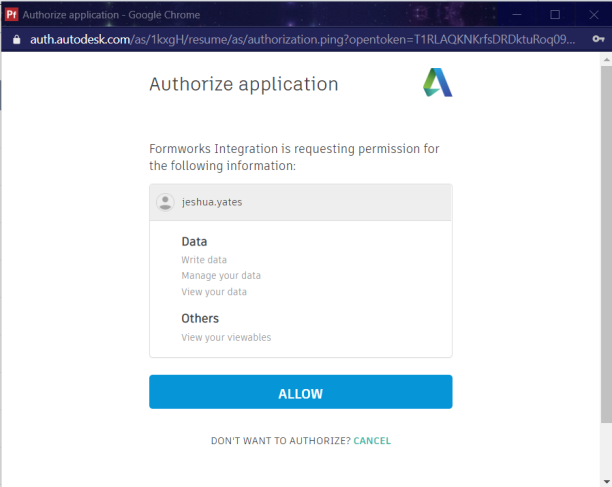
You will be asked to Authorise FORMS access to your BIM360 account.
-
When FORMS has been granted access to the BIM360 account, the usual style FORMS export screen will appear. However, a panel on the left side of the screen will include BIM360 Hubs that you have been granted access to in the BIM360 system.
-
You can click on the hub name, to insert it into the Hub name field on the right of the screen.
-
You can either select the blue, right arrow against the hub name, to expand the BIM 360 hierarchy into projects and folders, then select them,(by clicking on the name label), to populate the input fields on the right, or you can enter the Project and Folder field values directly, or you can reference fields within a FORMS template by its alias. You can deselect, say folders, by selecting the name label a second time. You can choose between your method of input by clicking on the Choose Folder from Tree button or the Project & Folder from Template Fields button. The selected button will be in blue while the unused option will be grey. By default the option will be to type in the Project and Folder names.
-
The alternative method of entering either the fully qualified field name, or alias of the template field names, provides more flexibility, in that you can dynamically change project and folder names based on, say, a dropdown list box. You do not need to enclose the field names with square brackets.
-
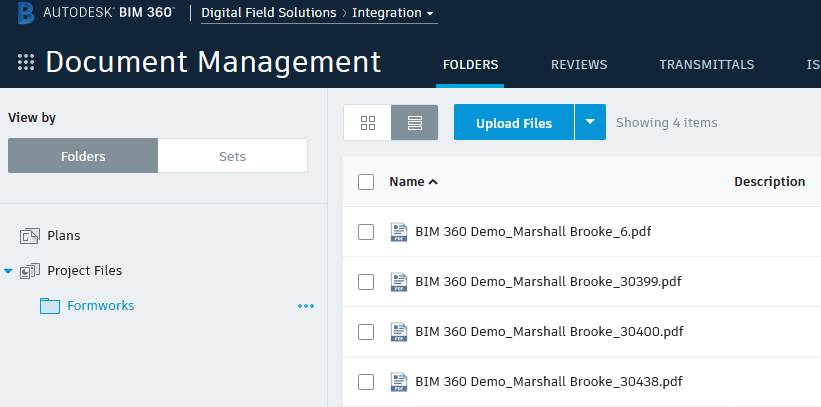
As you can see from the captures, the hierarchical directory structure displayed on the BIM 360 export screen will mirror the directory within the BIM 360 structur AUTODESK system.
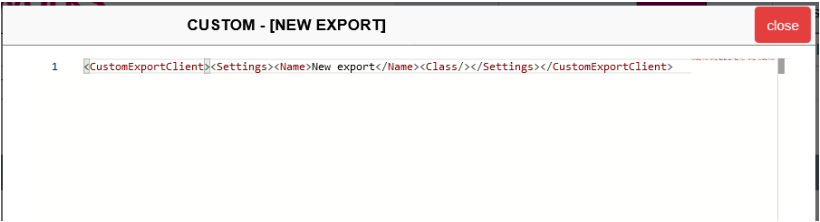
Custom Export (View only)
Custom exports represent bespoke exports developed by Digital Field Solutions. To view a custom export, from the Admin Menu, select, Manage Exports, then select the Custom Export to view from the export list.
The XML script will be different and contain different attributes based on the actions being performed within the export.
Custom exports are read-only at client level and can only be created and edited by DFSL staff.
Exporting to Excel
Introduction
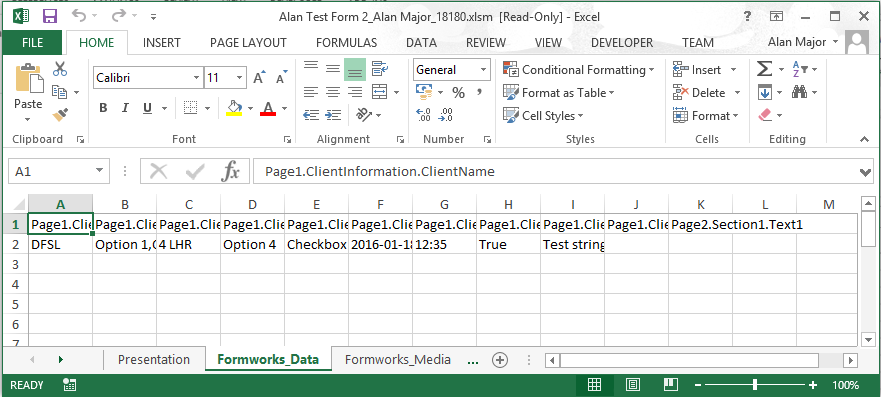
FORMS can populate an additional ‘Data’ tab on an Excel workbook template. One Excel template is populated per form submitted. 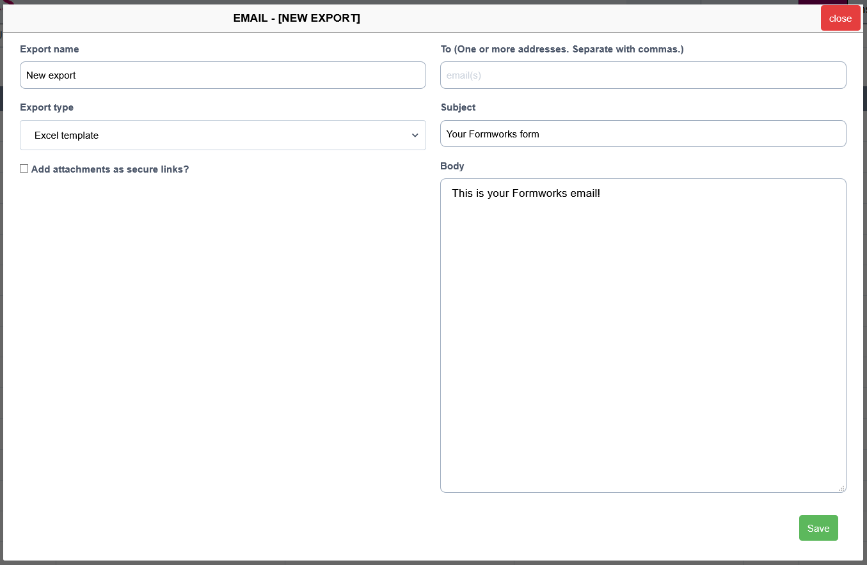
The first row on the template’s Data page contains every field name present on the FORMS template. The second row contains the values for the fields. You map fields where you wish the forms data to appear, against the Data tab. Additional lookup functions have been provided to make this easier. For example, you can look up fields on the Data tab by the field name, rather than an exact location. In this way if the field position changes, it does not invalidate your worksheet.
Please note that this export feature is not included with the standard FORMS licence, and is a chargeable option.
Creating an Excel Export

Create the export option as usual, selecting how you wish to have your Excel template delivered. For example, Email, Dropbox etc. Then from the Export Type drop down list box, select Excel template.
Word and Excel templates require an additional setup step to the basic exports. Select the Template Exports tab, locate the FORMS form template and click on the change option. On the table that opens on the right, select the export option created in the Manage Exports step. If you have already uploaded an Excel template, you can select the export from the list box and click on Set. You can upload or remove an Excel template document, using the delete and upload buttons.
Creating a new Excel Template
Create an Excel worksheet in the normal way, and either include an additional tab named FORMS Data, or the system will produce this automatically. This tab is used by FORMS to place the fields and data from your forms.
Importing the DFSL Utilities Code File
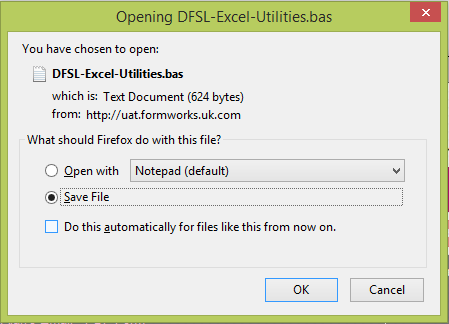
Whilst you do not have to use the DFSL Utilities, these provide a number of lookup functions to speed your template development time. From the export table on the right, select the </> code option. 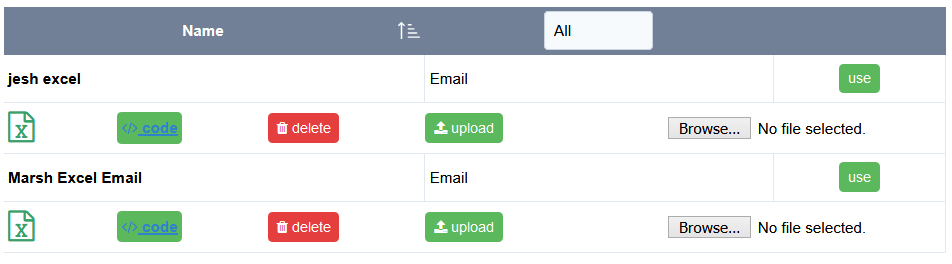
A standard dialogue box will enable you to save the DFSL Utilities file to your hard drive. Save the file, then open your Excel template.
You need to access the Developer tab on your Excel template. If this is not already present, take the following steps (Excel 2013).
Select File, Options, Customize Ribbon and place a tick in the Developer check box.
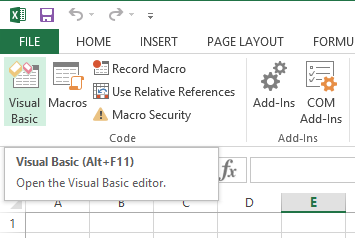
From the options at the top of the worksheet, select the Visual Basic editor. When the Visual Basic Editor window opens, select File, Import, then navigate to where you saved the DFSL Utilities file, and select Open to import it. Save the Excel file. You will need to save the Excel file as a Macro-Enabled workbook file type (.xlsm).

Viewing the DFSL Utilities Code File
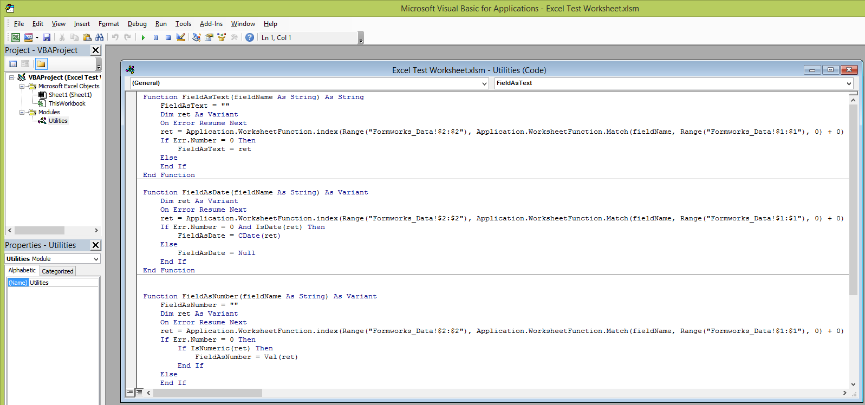
To view the functions contained within the Utilities module, from the Visual Basic screen, select the Modules branch of the project explorer. Then select the Utilities module.
Uploading the Excel Template

From the export table, (see top image), select Upload, then when the file has uploaded, select the Excel template from the list box and click the Set option.
Mapping Data in the Excel Template
Once you have uploaded and Set your Excel template, you need to map the data from the FORMS Data tab to your presentation tab. The easiest way to do this is to create an email Excel export that will direct the Excel output to you. Then open the FORMS form template on the iPad, complete some data and submit the form.
When you receive the Excel output, you will be able to see the data from the form that you submitted, displayed across the top of the FORMS Data tab.
Select the ‘presentation’ tab, where you wish the data to display in a nicely formatted manner.
Select the individual cells where you wish to place the data cells from the FORMS Data tab.
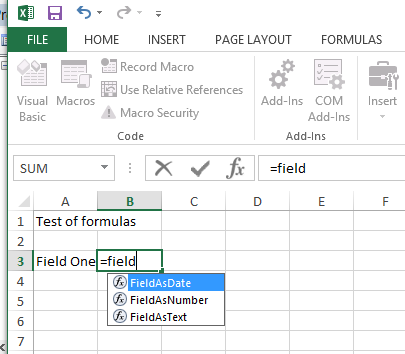
With the Excel cell selected, type an = (equals) character, then the start of the function name that you wish to use to populate the cell. Five bespoke functions have been included in the DFSL Utilities Module:
FieldAsText(fieldName As String) As String
FieldAsDate(fieldName As String) As Variant
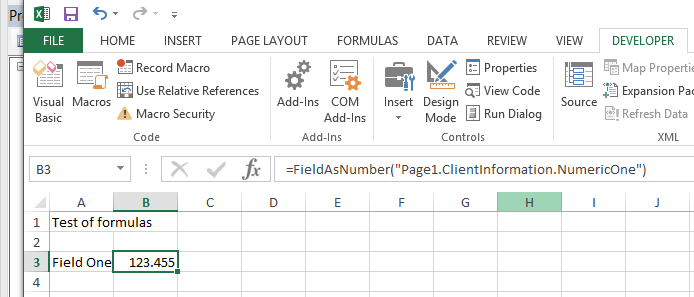
FieldAsNumber(fieldName As String) As Variant
EndsWith(str As String, ending As String) As Boolean
StartsWith(str As String, start As String) As Boolean
The FieldAs functions all work the same way; enter the field name from the FORMS template, or copy from the Formworks_Data tab, enclosed in quotes, as a string. The data will be brought in from the Formworks_Data page, irrespective of where it appears on the list of output fields. This means you can add and remove fields without having to rework your formulas
Default Export Option
Any export or notification can be set as the default option in the Manage Exports tab.
Click Default on an export option in the table.
To remove the default setting, click again to remove the tick in the Default box
Delete Export Option
Export options can be deleted in the Manage Exports tab.
-
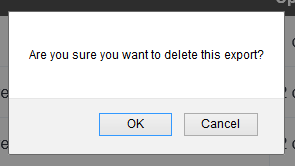
Click Delete on an export option in the table. A warning message is displayed.
-
Click Yes. The export option is deleted.
Formatting PDF output file names
When you select an Export Type of PDF, you can format the name of the PDF output file, based on the value of fields included in your documents. For example, if your document template includes the text elements; ProjectName, Technician and Date, you could take the values input against these elements, and produce a PDF file named appropriately. An example of this could be:
Test Project 2013-07-18 John Doe.PDF
You build the PDF file name by concatenating the values contained in the elements that you wish to include in the file name, and optionally including a separating character between the element values
Select each of the individual elements in turn, and copy the element names (or any name that is easy to remember), into the element’s Alias fields. The Element Alias property is located near the element Name property.
This gives you a simple name to write script against, rather than the element’s fully qualified name.
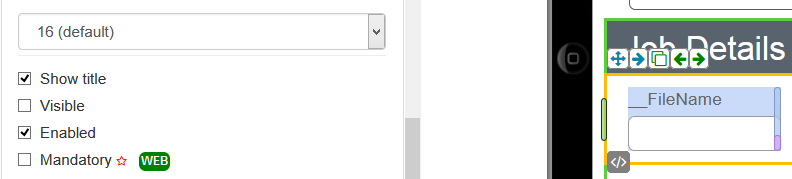
Place a text element on your template. Set the Title property to: __FileName and the Visible property to false. The actual name of the element is irrelevant. With the text element selected, choose the elements

OnValidate event. Enter a line of script that includes the Alias names of the elements you wish to comprise the PDF output file name. For example, ProjectName, InstructionDate and Technician are the Alias names of the three fields to be included in the PDF file name.
The two full-stop, (..) characters are used to concatenate (add) a space between the values. To include a hyphen, for example, you could substitute " " with "-".
You can include the unique form id, by using {formid}. For example: this.value = SURNAME.value .. "_" .. os.date("%Y-%m-%d") .. "_" .. "{formid}";
Please Note:
-
There is a length restriction on file names in Windows. Do not include address or free text fields.
-
You must NOT include the file extension (.PDF).
-
Only include elements that you are certain will always contain a value, by setting them as mandatory in script. Setting fields to mandatory is covered in the FORMS Scripting Guide.
Template Exports
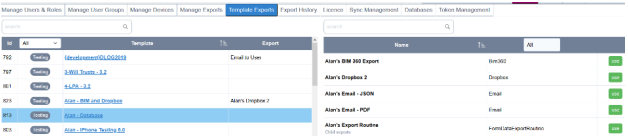
The template exports tab allows you to assign an export option to your form templates.

A list of your form templates is displayed in the table. The table can be filtered by typing in the filter input box, or by selecting “Published” or “Testing” templates.
Using the Template heading, you can sort the templates in either ascending or descending alphabetical order.
Select the template name to display the table of exports available to attach to your form template.
Changing Exports
Export options can be assigned to form templates in the Template Exports tab.
-
Select the template name. A window of export types and their relationships to each other is displayed on the right.
-
Select an export option. Note: If the Excel template option was selected in Manage Exports, you will need to select the relevant Excel template here.
-
Select the green Use icon next to the required export.
Export History
Introduction
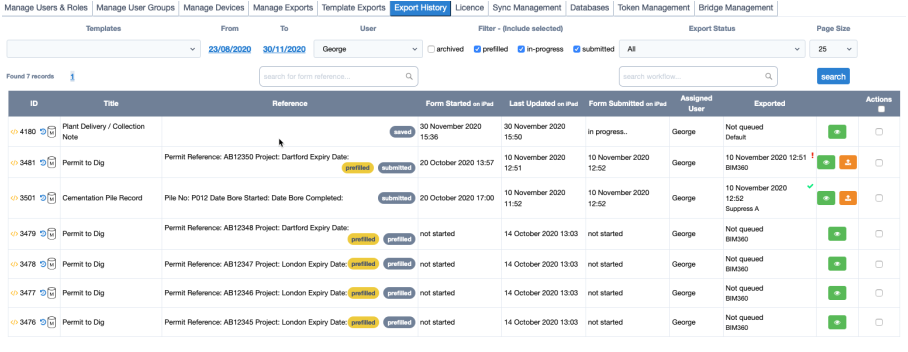
The Export History tab displays all the forms that have been saved, submitted and deleted. Though the amount of data available to view, is dependent on whether the form is still live on the system, or has been deleted or archived. The Export History tab is available from the Admin tab.
The Export History incorporates filtering and searching features. It also includes the facility to render viewed forms as they appear on the iPad, including embedded images, signatures and photographs. If location services have been enabled, maps are available, showing where the form was started.
This screen includes all submitted forms, both published and in design, including those that belong to templates that do not have an export routine attached.
Note: Form data is not permanently stored on the FORMS Portal. By default:
-
Form data is soft deleted (marked as deleted, still visible on the portal but removed from the device) 30 days after successful submission or immediately after deletion.
-
Form data is hard deleted (wiped & not retrievable) 60 days after successful submission or deletion.
These defaults may be amended on request.
Templates - This list box lets you select either a specific template or all templates, for inclusion in your search.
From / To – Selecting either date link, displays a calendar control. 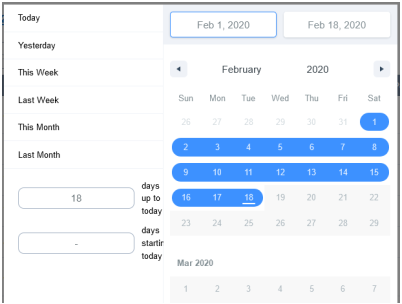
From this screen, you can either choose a fixed range of dates, for example, Today, Yesterday, This Week… etc, a number of days before /after today’s date, or you can specify an exact range of dates. To specify an exact range of dates:
-
Select either date link.
-
Either, select the start date for the search, then select the end date for the search. A blue band will highlight the range selected.
-
Or, select the start date, then drag the cursor to highlight the date range until the end date.
User – This list box allows you to select a specific users’ forms. By default, all users are selected.
Archived - this option displays forms that have been time deleted (by default, 30 days after iPad submission), deleted by users, submitted against retired templates or templates in design that have had data elements altered.
Please note - actual form data for these forms is only visible prior to hard deletion, which by default, is 60 days after submission or deletion.
Prefilled - This option is selected by default, and will include all prefilled forms. Remove the tick to exclude prefilled forms from the Export History display. Forms displayed with a yellow ‘prefilled’ tag are prefilled forms.
In-progress – This option displays forms that have been started, but not yet submitted.
Submitted – You can use this option to toggle whether or not submitted forms are included in the Export History display.
Export Status – This option lets you filter forms by various export status indicators. 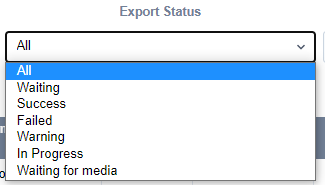
-
Waiting are forms that would display a clock symbol, submitted and waiting to be successfully exported.
-
Success represents successfully exported forms that would display a tick in the exported field.
-
Failed are forms that would display a red exclamation mark (!).
-
Warning is where no recipients are found to export to, so the export doesn’t fail, but doesn’t send anything either.
-
In Progress displays forms that haven’t been submitted yet.
-
Waiting for media are forms where, say, an audio file hasn’t been uploaded yet.
Page Size - Select how many forms you want to appear on the screen for ease of viewing. The options are; 25, 50, 100 and 200
Search for form reference - Searching is available and covers both the Reference column and the FORMS Form ID, as demonstrated in the capture. Wildcard searching is already enabled, so you can enter any text that appears within the Reference column, at any location within the string, without entering all the contents of the Reference. However, when searching for numbers, you will need to enter more information in the search, as if you only enter a number, the system will assume you are searching for the unique FORMS form ID. For example, I would need to include the text “Site: 1234”, to make the search work correctly. Enter the search text, then click on the blue Search button. Note: You can only search on text that is visible in the reference column.
Search workflow - This option is currently only available for Web Forms which supports workflow steps. The workflow search field matches data in the workflow tags that display in the reference text column.
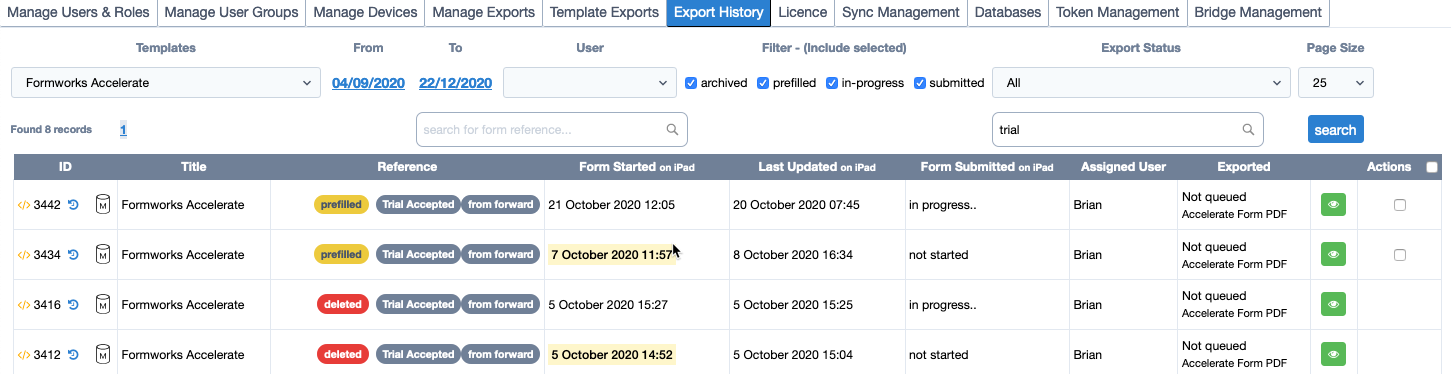
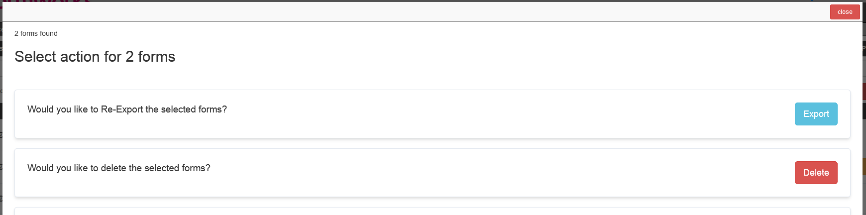
Actions - The red Actions button will only appear, when you place a tick in the Actions checkbox for one or more form rows. The Actions button will display a dialogue box that can contain one or two options, depending on whether the selected form(s) has been submitted or is in progress / saved. If the form has been submitted, it will only provide the option of Re-Exporting the form. If it is in progress, you will have the option of deleting it. 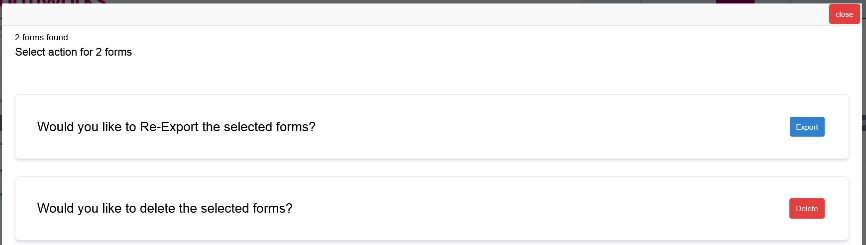
</> Form Content
Selecting this symbol loads the data from a form into a new browser page. You can search within the form data by using the standard Ctrl F characters. This can be useful in locating the contents of an element that may be hidden on the PDF.

ID
The ID uniquely identifies each submitted form. When you raise support tickets, this is a very useful piece of information to pass to the FORMS Support Desk.
History - Clock Icon

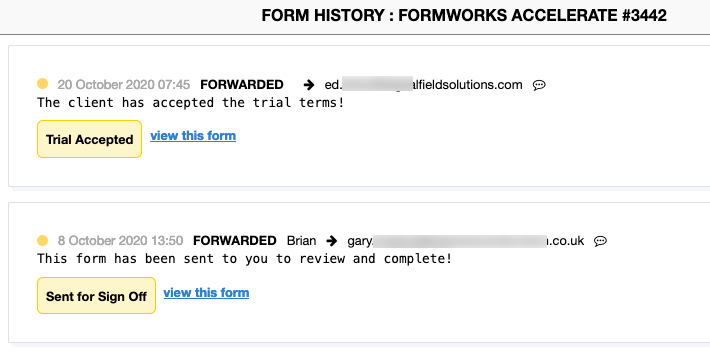
This option provides data on the history of the form, for example, when it was saved and submitted. But this option is particularly useful when form forwarding is being used. In this example, the form was forwarded by Brian to Gary, who then forwarded the form to Ed. Hovering over the text bubble symbol at the end of the email address, displays any notes.
Colour coding
-
Yellow - Forwarded.
-
Pink - Rejected
-
Grey - Saved.
-
Green - Submitted
Metadata Icon
Tapping the metadata icon opens the metadata control panel.
Within the control panel, metadata associated with a prefilled form can be viewed and amended -changing the metadata on the users device. This is useful when needing to update information in a prefill form such as an appointment time or work order.

Title
This is the title of the form template.
Reference
The Reference column includes whatever template elements were included in the Form Reference Text area of the Template Designer. This is the same information that displays against submitted forms on the iPad.
Reference text for archived forms that have been hard deleted contain no data.
Form Started on iPad
The date and time when the user first opened and made a change to the form. On pre-fill forms this will appear blank on the Export History until the device user opens and changes a form.
Last Updated on iPad
The date and time when the form was last updated. This could occur just by opening the form on the user’s device if script is running in the forms OnOpen event that could trigger a change.
Form Submitted on iPad
The date and time when the Assigned User (last) submitted the form. As a form can be submitted multiple times, you would need to check the Process History to view individual submissions.
Assigned User
With Prefilled forms, this would be the user assigned in the prefill upload file. Otherwise it would represent the currently assigned user, or the user who started the form from a blank template.
Exported
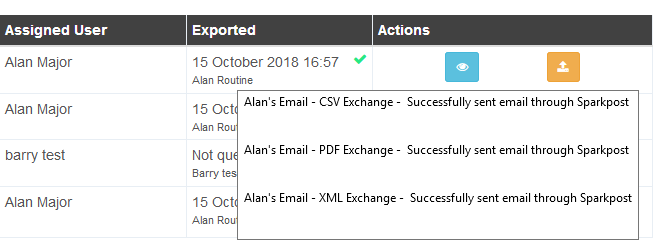
The Exported column indicates, using a green tick or red exclamation mark, whether or not a form has successfully exported. A blue clock icon shows if the export is in progress. It also provides the time the export was made or attempted. Further information is available by hovering the mouse pointer over the export date. This data is dependent on the method of export being employed by the form. For example, FTP transfer information would be included if this method is being employed to deliver your forms.
View Icon

The green “Eye” icon is used to view the data currently available to FORMS for
the selected form. Please note - this could be out of date, if for example the user has been completing the form off-line and hasn’t synced with the FORMS server yet. Data is not visible for archived forms that have been automatically hard deleted (by default 60 days after submission or manual deletion).
Selecting the relevant form and tapping the “eye” icon displays the form as it would on the iPad. The separate pages of the form show as separate tabs across the top, and all images, signatures and photos are included.
Displaying Photos
If the form being displayed includes photographs, these will be displayed as they would appear on the iPad. In addition, clicking on individual photographs will enlarge them for ease of viewing. To close the enlarged photographs, click them a second time.
Info Tab
Selecting the details tab displays the template name, the Reference field information, Form ID, who the form was assigned to and various data transfer information. If location services are enabled, a map indicating where the form was started is displayed.

Actions
Single Form Actions
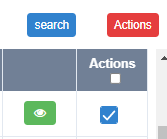
The last ‘headed’ column of the Export History screen, Actions, contains a check box that you can select to delete not-started or in- progress/saved forms or Re-Export submitted forms.
Bulk Form Selection Actions
The last column header of the Export History form table, contains a checkbox that selects all the filtered forms in the view list for bulk deletion (non submitted forms only) or re-exporting (submitted forms only). Tapping the red “Actions” button pops the Actions menu.
Status Tags
Form entries within the display table can include a number of information tags.

These typically include:
-
Prefilled (Yellow)
-
Saved
-
Submitted
-
Deleted (Red)
-
Open (Token) Links (blue)
The tags also display workflow steps associated with Webforms that utilise workflow.
License
The Licences tab displays details of your FORMS licence and the allowances under the licence.
Dates
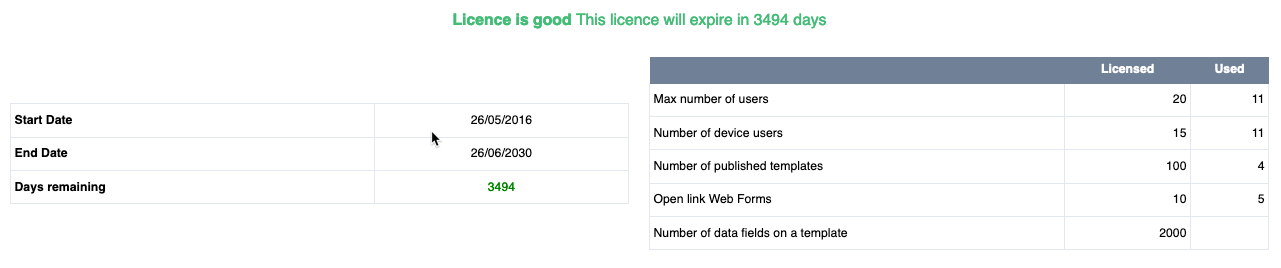
Start Date / End Date / Days remaining
These two fields indicate the start and end dates for the account licencing period. Days remaining shows the number of days before the licence period expires.
License Limits
These are broken down as follows:
-
Users include both Device (Mobile App) Users and Webform users. In this case 11 out 20 Users are being used.
-
Device Users are users of the FORMS Mobile App, a subset of users. In this case, 11 out of a potential 15 device users are being used.
-
Published templates show how many published templates are allowed, this doesn’t include any in design templates.
-
Open link web forms represent the number of webform open links available (open links provide access to web forms without the requirements for users to log in). In this case, 5 out of a potential 10 open links are in use.
-
Data fields on a template show the limit of fields allowed per template.
There is no restriction on the number of Administrator and Form Author users.
Whilst users cannot be removed, for example when staff leave, they can be disabled, by removing the tick from the Enabled check box on the user’s record. They will then no longer count against the user limit. See: Add New User
Number of published templates
This field indicates how many Published forms can be present on an account. This restriction only applies to forms with a “Published” State. An account can contain any number of forms with a “Designing” State. When published forms are no longer required, their State can be set to “Retired”, to enable new forms to be published.
Warning: Only Published templates should be used to capture live data.
Max number of data fields on a template
This represents the number of data capture elements that can be used within each template. Note: Whilst it is possible to develop, save and test forms with a larger number of elements than indicated within the licencing screen, it is not possible to publish them.
Current Permissions

This table indicates the FORMS features available to the account. If addition features are required, please contact your sales representative, or contact Digital Field Solutions at: support@digitalfieldsolutions.com
Common features/functions include:
-
Validation scripts - access to form scripting
-
Prefilled forms - ability to pre-fill form templates
-
Notifications - ability to set export notifications
-
Access forms after submission - forms can be accessed the user after being submitted
-
Automated pre-fill - option to pre-fill forms via API
-
Export to web service - option to export via web service
-
Web Forms - access to web forms via a browser
-
Local tables - local database functionality
-
Audio - option to record and process audio on the device App
-
Export to Excel - option to export form data to an Excel template
-
Export to BIM360 - option to export data directly to Autodesk BIM360
-
Export to Dropbox - option to export forms directly to Dropbox
Allow users to save passwords on devices
If this option is selected, all device users for the client account will have the option of saving their passwords on their input device. This will then be at the discretion of individual device users. They will have the option of cancelling the saving of passwords, from within the FORMS applications Information screen, should they subsequently change their mind.
Allow Users to save to / read from device camera roll
These options control the ability for App users to save or retrieve images to/from the camera roll
Is 2FA required?
Enables two-factor authentication for the portal only. A ‘MFA’ role will also need to be enabled to a user. More details on 2FA can be found in our 2FA User Guide.
Custom Mark-Up Icons
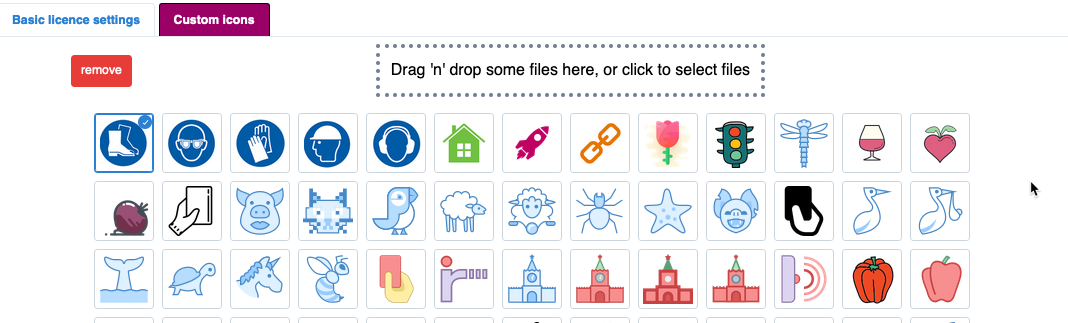
This function enables custom icons to be added for use in the sketch and photo mark-up function of the device App.
To add an icon simply drag an image onto the panel and save it. It will automatically be resized to the correct dimensions and become available within the App sketch and photo markup capability.
Your API Secret Key

This code is required when importing and exporting form data via the FORMS Web Service.
Sync Management

The Sync Management screen allows you to monitor the synchronisation processes that have taken place between the FORMS portal and a device user’s iPad. You access the Sync Management screen by selecting the Admin tab, then the Sync Management screen.
Sync Users Table
The Sync User’s Table on the left of the Sync Management screen indicates the user names, Device Names, the iOS Operating System on the device, the version of FORMS on the device, and when the user last synchronised with the server.
A new entry is created on the list each time a user reinstalls the FORMS application or logs in from a different device.
Locating sync entries
The list is in descending order of login, but you can search for all instances of a User’s name or Device name by entering the details at the top of the screen in the search field. This is the simplest method of finding the correct entry. Normally you would be looking for the latest logged in instance of the user’s name. Use the ‘select’ button to select the user’s sync records, defaulting to the Submitted tab.

Sync Templates and Forms Table
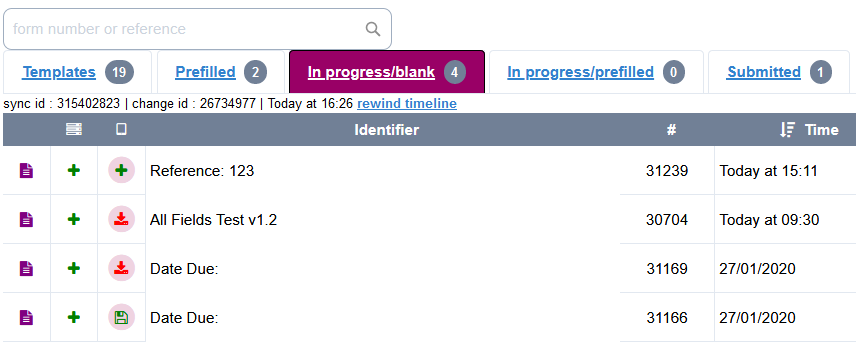
There are five tabs, representing blank Templates, Prefilled forms allocated to the user, In-progress-blank forms that have been started by the user from blank templates, In-Progress- prefilled forms and forms that have been Submitted. These correspond to the folders on the iPad. Columns
There are five main columns:
Page Icon
The first column contains the Page Icon. The colour of this icon varies depending on the type of document. Yellow entries are templates, blue are prefilled forms, mauve are forms submitted against blank templates. Selecting the Page Icon displays a complete history of actions performed on a form.
Server
This column represents the last action that the server took against the form. The types of icon displayed here will depend on the tab that you are viewing. For example, in the templates tab, you would normally expect to see either a green plus sign, to indicate that a new template has been created and inserted into the system database, or a yellow pen icon, to indicate that a template has been amended. The red bin icon will indicate if a template has been deleted or retired.
iPad / Device
This column indicates the last action that the user’s device performed against a form. This would normally be a green save icon to indicate that the user has submitted the form, as in the case of the fourth entry above.
Identifier
This is the template name or form reference.
Form ID (#)
This is the unique form ID given to each form by the FORMS portal.
Time
The date and time that the action represented by the table entry was performed.
Last entry indicator (circle)
Whichever location, server or iPad/device, will be indicated by a circle around the icon.
Submitted Tab
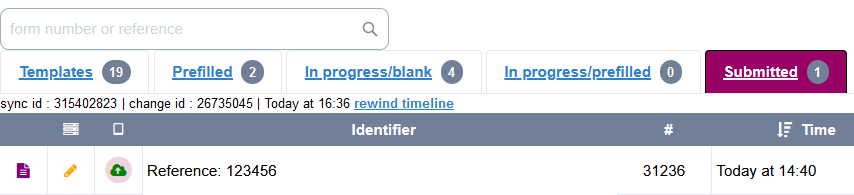
The Submitted tab will be displayed by default when you select a user. This table contains the individual FORMS forms that are part of the synchronisation process for this specific user, in descending date, time order.
Green Flag icon
This icon indicates that the form is beyond the date when it should be retired from the user’s device, and has been archived on the server. The next time the user syncs with the system, these green flag forms will be removed from their device.You can see this in the second capture.
Yellow Pen icon
The yellow pen icon in the Server column, indicates that the last action on this form by the server was to update the form on the portal.
Templates
Page icon
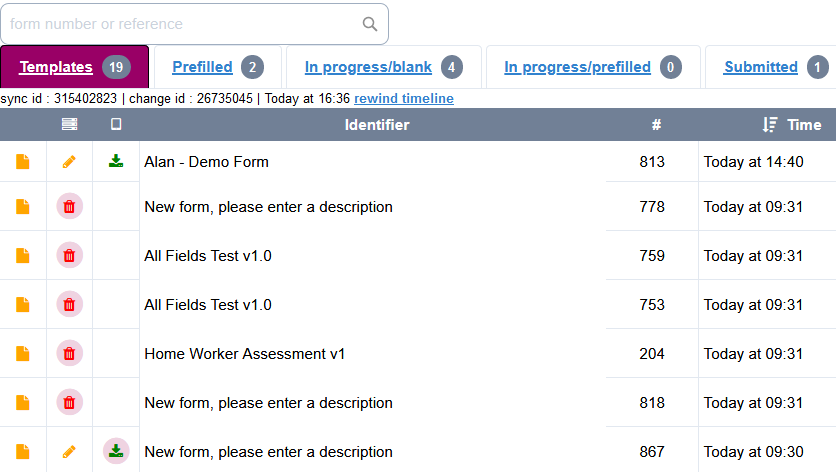
The colour coding of the Page icon in the first column represents the type of document:
Yellow is a FORMS Template, Blue is a Prefill form, Purple is a form that has been Submitted from a blank template.
The yellow ‘page’ icon here indicates that you are viewing a FORMS template. Place the cursor over this icon to display the template’s description, as entered in the Template Designer.
Selecting the Page icon pops up a window with the history of actions taken against the template. In this instance, the first template in the table. It shows when the template was last updated and when it was delivered to the user’s device.

Menu icon
A yellow pen indicates that the last action against the template was when the server updated it.
A green plus icon indicates that the last action taken with this template, was inserting it on the users device
iPad icon
A green down arrow indicates that the form has just been downloaded to the device.
Prefilled tab
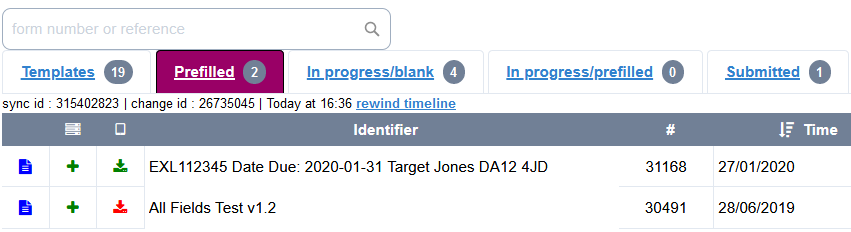
When forms are first uploaded, they will appear in the Prefilled tab as per the screen capture. Selecting the History icon will show that the form has been inserted into the FORMS database, but has not yet synched down to the device user’s iPad.
When the device user syncs with the server, and the iPad confirms receipt of the prefilled form, a green download arrow will appear in the iPad column of the table and a circle will appear around the tick, indicating that this is the last action to be performed against the form. Selecting the Page Icon will show the syncing history.
Page Icon
With prefilled forms, the first indication on the Page Icon will be when the form was inserted into the FORMS portal database.
In Progress/blank
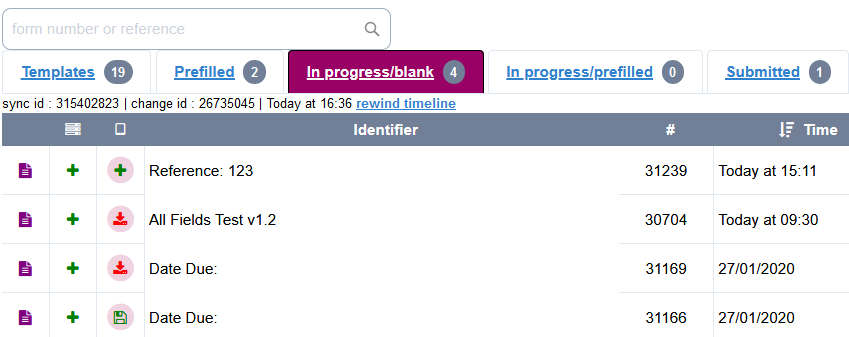
These captures show the In progress-blank folder. These blank template forms have just been saved on the iPad.
The mauve Page Icon indicates they originated from a blank template. The green plus icon indicates that the last act of the server was to insert them into the database. Selecting the Page Icon displays the history of actions performed on a form.
Updating a form on the user device causes the server column icon to change from a green plus to a yellow pencil. This indicates that the last action by the server was to write changes to the previously saved instance in the database of this form.
In progress/prefilled
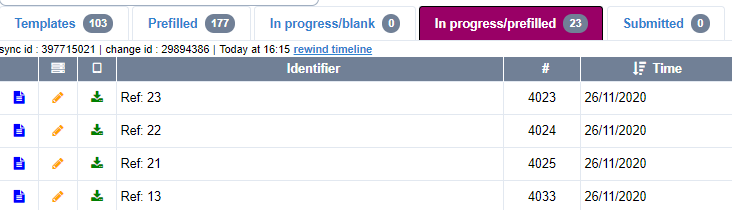
Forms in this folder can be recognised as prefilled by the blue Page Icon. The yellow pen inside a circle indicates that, as the form already existed on the server as a prefilled form, the last action the server performed was to update/write to it. The green download arrow in the user device column simply shows that the form is present on the user’s device.
Submitted
The Page Icons show that the first form submitted in this example, is a prefilled document (blue), whilst the following four were all produced from a blank template.
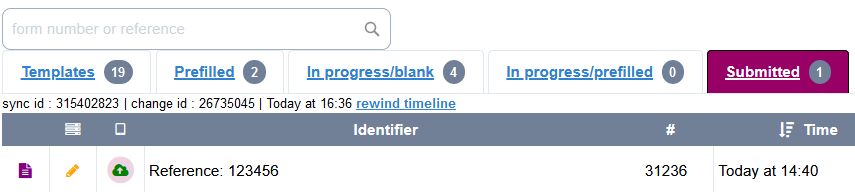
Server icons are all enclosed within circles, showing that the last action performed against any of these forms was by the server, rather than the client (user device).
The white arrow against a green background indicates that the last action by the user’s device was to upload these forms.
Databases
Introduction
Databases offer a convenient option, whereby databases in UTF-8 format, Comma Separated Value (CSV) files, can be uploaded to the FORMS portal, and synchronised to the FORMS App (or made available to Webforms).
Whilst the FORMS App has the facility to make web calls to retrieve data, or confirm input, the benefit of locally stored databases, is that they reside on the user’s device. They can function even when the user is offline. When the user next logs in to the FORMS portal, the latest version of the database will be synchronised with their device.
Databases uploaded to the server are also available within Webforms.
There are many possible uses for databases within a form, and examples could include:
List boxes
-
Populating a list box with client names, or branch addresses and contact details, rather than hard coding them into the template.
-
Populating a second list box (or text box), based on the value selected in another list box. Multi-tiered list box population is supported in this fashion.
Quotations and calculation
-
Providing a look-up table of cost values for products selected on a form. Databases can contain all the product cost information necessary to provide up to date quotes as a form is completed.
Workflow and Project management
-
Returning an email address or URL for a contact/employee selected on a form. A form could be automatically emailed to a contact or group of contacts, depending on information within the form.
-
As a form is aware of the user’s name when it opens, list boxes could be populated with information specific to that user. Using a local database the system could populate list boxes with only the projects or clients that are applicable.
-
You could automatically provide the device user with a list of additional forms that should be completed, based on the data entered within the current form. For example, a certain client may always require an additional ‘Notes’ document.
-
The ‘rules’ regarding specific clients could be represented within databases, which are subsequently interpreted within script to guide user input.
-
It is possible to capture information on a form, which automatically updates the local databases on all users’ devices after the form is submitted. But this feature does not come as standard with FORMS.
Maintaining Databases
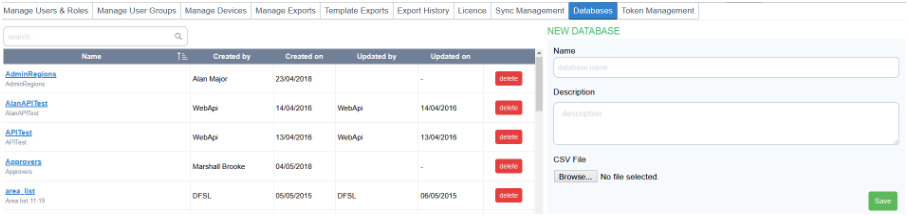
When you have prepared the CSV file, select the Admin tab, then Databases:
Databases on server
The Databases on server panel lists all the databases that have been uploaded to the portal and are available to be incorporated into form templates. If you select an individual table, it will highlight, and display details such as the number of rows in the table, the login used to create it, and the date created. If you select “follow selection” from the radio buttons beneath the Saved Databases section, the database on user devices Sync Logs will display the devices that contain the selected database.
Creating and Updating Databases
Making a CSV data file
To create a FORMS Database, you need to save the Database to a CSV file. The easiest way to do this is probably to create an Excel worksheet, placing your Database data in columns, then save it as a CSV file instead of a workbook, using the File, Save As option, then change the file type to CSV.
Uploading the CSV data file
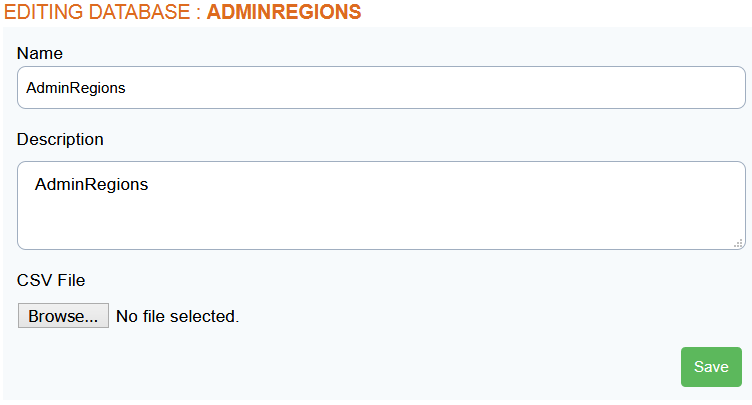
-
From the Databases tab, enter the name of the new database in the Name field on the right of the screen. The name must not contain any spaces, but you can use underscores, for example, staff_list.
-
Enter a description.
-
Browse to the CSV file and select it.
-
Select Save.
-
A message indicating that the file has been saved will display.
-
The same process is used both to create a new database and to update an existing one. To update an existing database simply use the same name.
-
Note:
You cannot delete a database that is in use by a published template. The template must be retired first. If you delete a database in use by a template in Design state, the database will need to be added via the Template Designer.
In addition to the above method, it is also possible to create an automatic upload procedure that employs the FORMS API so that you don’t need to manually upload CSV files.
Converting CSV files to UTF-8 Format
In some instances, where characters such as £ and $ have been used, a CSV file produced by say, Excel, will need to be specifically converted to UTF-8. To accomplish this use the following steps.
Open the CSV file using Excel, select File then Save As.
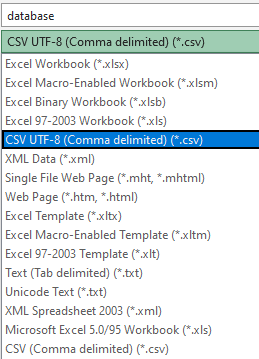
Below the name of the CSV file is a list box containing different file extensions. Select ‘CSV UTF-8 (comma delimited). Then press Save.
Using Databases on your Templates
Once you have uploaded your Database, use the Template Designer screen to attach it to your template. On the Form Properties section of the designer, select the Databases option to list the available databases.
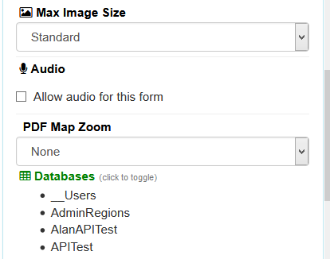
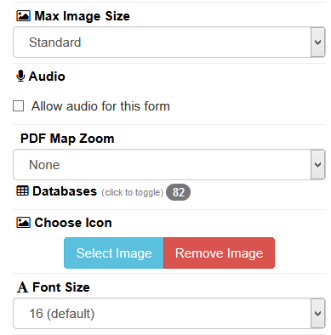
The Script Template window
The use of databases within your template for the FORMS App is dependent on use of the Lua scripting language (Java scripting is used for Webforms), and a full discussion of this is beyond the scope of this guide. But an example of the Lua script required to populate a list box is provided here. 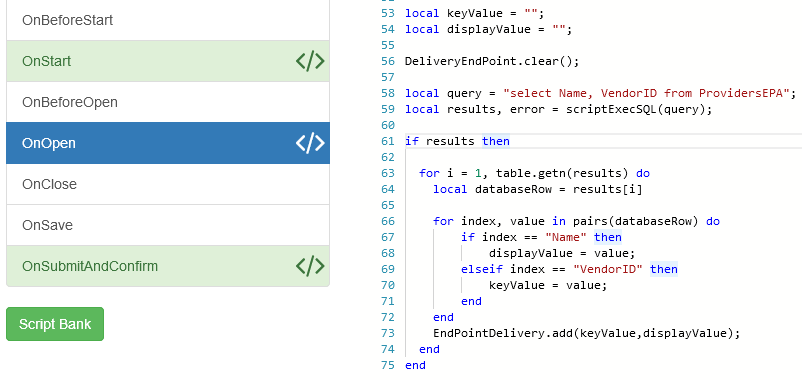
The new Script Template area lists which databases are available for use within your code, and if you select a database, the columns drop down list will inform you of the column names, so you can include them within your queries.
For details of how to implement databases within a template, refer to the FORMS XD Scripting Guide.
Token Management
The Token Management page can be used to view and edit Open Links. To access, click the Admin tab and then the Token Management tab. Open Links are not included with the standard FORMS licence, and is a chargeable option.
The top of the page has a green Create Link button that can be used to make new Open Links. Next to this button shows how many Open Links are being used as well as the total amount available, in the above example there are 6 Open Links being used out of 10 available links. Below this displays all current Open Links, enabled and disabled, within a table.
Copy (column)
The first column can be used to copy the link to the device’s clipboard using an orange copy button.
Name
This column displays the title given to an Open Link. Also known as a ‘friendly name’. To edit an existing Open Link, click on the name.
Link
The Open Link’s website address is displayed here, it is typically quite a long address so is shortened in the table. There is a note below the link suggesting that users right click on the
link and open in Incognito mode on their browser. This is recommended because if a user opens an open link while logged onto FORMS, it will log them out as Open Links are enabled for non FORMS users.
Created By
The name and email address of the user that created the Open Link is displayed in this column.
Created On
This column displays when the Open Link was created.
Expires
If an expiry is set for the Open Link it will display in this column. If there is no expiry, ‘no expiry!’ will display.
Delete
This column is used to delete any open links, this can be done by clicking the red ‘delete’ button. You will be asked to confirm you want to delete the Open Link before continuing.
Creating an Open Link
Before being able to create an Open Link there are a few steps that need to be followed. Open Links can only be assigned to a Token User so the first step is to set up a Token User in the Manage Users & Roles tab. This can be any email address and the user won’t need to set up a password as a Token User account doesn’t have access to FORMS. It is created for the sole purpose of Open Links. Fill in the email address and name, select ‘Is Active’, then in the dropdown box below, select ‘Open link (Token) user’.
Then save the user.

Once created, go to the Manage User Groups tab and create a User Group, this can be named anything. Add the Token User and any templates you’d like to use for the Open Link and save the group.
Now we can head back to the Token Management tab. To add a new Open Link, click the green ‘Create Link’ button, this will display the pop up screen on the right. After naming the Open Link, select the Token User from the User dropdown list. The Template dropdown will then populate with any templates that are in a User Group with the selected Token User. Choose the template you want.
You then have a few settings to choose from. If the Action menu is enabled, ‘validate’, ‘submit’ and ‘delete’ buttons will display at the top of the Open Link when opened. If saving is enabled there will also be a ‘save’ button. We would recommend enabling the action menu and saving only if the open links will be used by FORMS users. As the Open Link form is only accessed via a link, saving the form would not be possible for a non FORMS User as the next time they click on the link, it will open a new blank form.

If Forwarding is enabled then the action bar will have a ‘Forward’ button, when pressed the pop up on the right will show. To forward the form, you will need to enter an email address, this can be to a FORMS User or a non FORMS User. You then have to type a message and click Forward. The assigned email address will then receive an email with a link to the form.
If Returning is enabled, once the form has been forwarded, the person that received it can return the form to the original user. We would only recommend allowing returning if the Open Link is being used by FORMS Users.
The Submit text allows you to change what the Submit button says. For example you could change the text from Submit to Submit for Authorisation.
 -->
--> 
You can also set the length of time you want the link to be available for.
The Open Link can have no expiry, expire in a day, week, month or year.
Lastly, ensure that the ‘Token is enabled?’ checkbox is checked and then press the ‘Create Link’ button. If you don’t want the Open Link to be enabled when creating it, uncheck the box.
Updating an Open Link
To update Open Links, click on the Open Link name column within the table and this will pop up a screen similar to when creating a new Open Link. The difference being that the green ‘Create Link’ button now says ‘Update Link’.
Bridge Management
The Bridge Management page can be used to view forms uploaded via the SQL Bridge as well as those updated within the app. To access, click the Admin tab and then the Bridge Management tab. The Bridge Management feature is not included with the standard FORMS licence, and is a chargeable option as the SQL Bridge.
The Bridge Management page is divided into 2 tabs, Inbox and Outbox. By default the Outbox tab will be shown. These tabs show within tables, forms that have been sent from the Client to FORMS or forms that have been updated from the FORMS app. The forms sent from the Client to FORMS is done in a similar way to uploading prefills, however this is done directly from the Client's environment without needing to access the FORMS portal to upload.
Unique ID / UniqueKey
This column displays the form id, template name and if applicable a unique reference or Key for the upload.
Username
If Inbox is selected, this will display the email address for the user the form has been assigned to, this is pulled from the prefill csv import. If Outbox is selected then the user’s name will be displayed.
Created On
The date and time that the upload or download occurred.
Status
If Inbox is selected then there are only two statuses: ‘prefill’ (green) which is an upload or ‘deleted’ (red) which is an update. If Outbox is selected then the two statuses are either ‘saved’ or ‘submitted’, both green.
P-Time (Proces Time)
The date and time that the process was actioned.
P-Status (Process Status)
This column displays the process status. There are three possible statuses: ‘success’ shows in green, ‘error’ in red and ‘warning’ that shows in orange. If the status is ‘error’, the amount of retries will display below as in the image to the right.
Outbox
The Outbox tab will display any forms that have been saved or submitted on the FORMS app and updated to the Client.
On the left hand side of the page there are filter options. You can filter by the user, form status (submitted or saved) and process status (processed, error or warning).
You can also view the logs. This is sorted by year, month, day and time. When you click on one of the time logs you get a message similar to below, depending on what the update was.
The date of the log is shown at the top. The information included is the form Id number, CustomerKey (if present), the FormId string, form status, template Id, TrackingId, Description and Service Class. If there is reference text, this will also show in Description.
Inbox
When the Inbox tab is selected, the table on the right will filter to include forms sent by the Client to FORMS using the SQL Bridge. The options on the left are the same as when Outbox is selected except it doesn’t have the ‘Form Status’ Filter.
The logs are downloadable csv files of the csv prefill uploads. These will delete after ##days
Install
Introduction
The Install screen is used by FORMS Enterprise clients, to enable the installation of the relevant Enterprise version of the FORMS application. Only the latest version is available to view and download.
Administrators and Device Users

Administrators and Device users have the option of logging into the FORMS portal on their iPads, accessing the Install page and installing the current Enterprise build.